How to perform a ankle joint injection
Source
Surgeon:
Joonas Rautavaara (rheumatologist)
To access the full video and additional content on this subject, log in or subscribe
Summary
Focus: Safe access to the subtalar and talocrural joint for synovial fluid sampling and local treatment.
Key elements: Patient positioning, anatomical landmarks, injection technique, synovial fluid analysis, aftercare, pitfalls, and complications.
Indications and Clinical Context
General
Medical expert: Joonas Rautavaara (rheumatologist)
Names of procedure: Ankle joint injection, ankle joint puncture, ankle arthrocentesis, intra-articular injection of the ankle, ankle joint aspiration
Goal
Safe access to the subtalar and talocrural joint for synovial fluid sampling and local treatment.
Problem
Unspecific ankle joint effusion or the need for local treatment of an inflammatory joint condition, gout, or osteoarthritis.
Diagnosis
Idiopathic gout (ICD-10: M10.0)
Other chondrocalcinosis (ICD-10: M11.2)
Other rheumatoid arthritis with rheumatoid factor (ICD-10: M05.8)
Arthritis, unspecified (ICD-10: M13.9)
Primary osteoarthritis of other joints (ICD-10: M19.0)
Pyogenic arthritis (ICD-10: M00.9)
Short Pathophysiological Description
Upper (talocrural) and lower (subtalar) ankle joints are commonly inflamed in conditions such as rheumatoid arthritis, psoriatic arthritis, and reactive arthritis. Inflammatory conditions can lead to synovial hypertrophy and increased production of synovial fluid in the joint.
Key Anatomical Structures
Bones
Tibia
Fibula
Talus
Calcaneus
Joints
Subtalar joint, formed by talus and calcaneus
Talocrural joint, formed by tibia, fibula, and talus
Muscles/tendons
Tibialis anterior
Extensor hallucis longus
Extensor digitorum longus
Blood vessels
Dorsalis pedis artery
Step-by-Step Technique
Preparations and Patient Positioning
The patient is in a supine position with leg extended and heel against the table, toes pointing up.
An alternative position for the procedure is knee flexed with the sole of the foot against the examination table.For both subtalar and talocrural joint access, a blue needle (length 30 mm/1 ¼", size 23G) can be used.
For anti-inflammatory treatment and for alleviating symptoms of osteoarthritis in the subtalar and talocrural joint, 40 mg methylprednisolone or 20 mg triamcinolone can be used. Glucocorticoid can be diluted in 1 ml/cc saline or local anaesthetic.
Subtalar Joint Injection
1. Landmarks and Injection Site
Palpate the lateral malleolus. The entry site is slightly distal and anterior to the lateral malleolus at a palpable depression.
Mark the entry site.
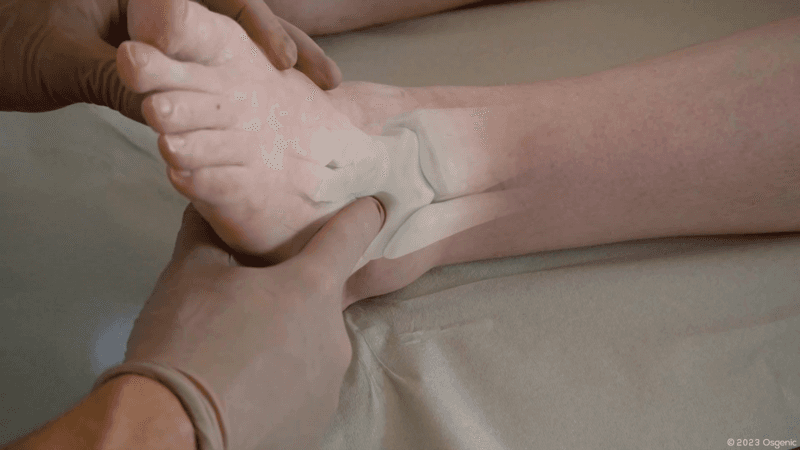
Log in or subscribe to access full content and see all the images.
2. Injection
Clean the skin area.
Turn the ankle inwards (inversion), which improves entry to the subtalar synovial space by opening the joint.
Insert needle perpendicular to the skin.
Check that the needle insertion depth is about 1–2 cm from the skin surface. If the insertion is too superficial, the medicinal agent may end up in the subcutaneous fat. There’s typically very low resistance in the joint space.
Inject the medicinal agent appropriate to the situation.
Talocrural Joint Injection
1. Landmarks and Injection Site
Palpate the distal anterior edge of the tibia, which is usually well palpable. Also palpate the tibialis anterior and the extensor hallucis longus tendons. Medial to these is a palpable depression.
Mark the entry place at the site of palpable depression.

Log in or subscribe to access full content and see all the images.
2. Injection
Clean the skin area.
Insert the needle in a slightly lateral direction under the extensor tendons, making sure to proceed in a transverse plane to gain access to the joint space.
The insertion depth is about 2 cm from the skin surface.
Confirm by aspirating that the needle tip is not in a blood vessel.
Inject the medicinal agent appropriate to the situation.
Synovial Fluid Analysis If a Sample Is Taken
The turbidity and colour of the synovial fluid can be assessed visually. Fairly clear synovial fluid with visible graduation scale is a sign of no pronounced infection. Cloudy synovial fluid is caused by a large number of white blood cells making the graduation scale invisible.
If the cause of joint effusion is not known, take a sample if possible.
Cell count + crystal analysis and bacterial culture
If antibiotic treatment has been started and there is a strong suspicion of septic arthritis, order bacterial nucleic acid analysis.
If a Lyme disease-related joint condition is suspected, order Borrelia nucleic acid analysis.
If only a drop of synovial fluid is available, a bacterial swab sample can be taken.
To access the full video and additional content on this subject, log in or subscribe
Piftalls and Complications
Pitfalls
Wrong Injection Site
Subtalar and Talocrural Joint
Injecting too superficially might cause the medicinal agent to end up in fat tissue.
Avoid puncturing the superficial veins.
Talocrural Joint
Be aware of the surrounding neurovascular structures. Dorsalis pedis artery and other blood vessels run near the injection site. Confirm by aspirating that the needle tip is not in a blood vessel.
Avoid injecting through or in the tendons, since this will cause pain to the patient. Also, injecting while the needle tip is inside a tendon will cause a significant resistance.
Challenges With Sample Aspiration
If the joint capsule is thickened, synovial debris may block the needle when aspirating. The risk increases with the aspiration force and syringe volume. Try changing to a smaller syringe. You can also try to unblock the needle tip by injecting a small amount of fluid into the joint and then reaspirating.
If sample aspiration is unsuccessful when acute gout is suspected, try saline irrigation. After injecting 1 ml of fluid try aspirating again. This will also yield a sample for bacterial analysis.
Storage of a Synovial Fluid Sample
A synovial fluid sample should be analyzed promptly after taking the sample. Synovial fluid containing blood will rapidly coagulate. There may be cell degradation in the sample after just an hour. Crystals, on the other hand, are inorganic salts and are better preserved and so their analysis can be made the next day.
Injecting Too Frequently
In case of acute inflammation, intra-articular injections can be given at 1-month intervals for the first 3 months. Afterwards, if needed, 3 months apart.
There is no strong evidence of adverse effects of glucocorticoids on the joint, although frequent injections may cause unwanted systemic effects.
Complications
Infection
Intra-articular infection after a joint injection is very rare, the incidence being 1:2000–1:100 000, most commonly 1:10 000. Nevertheless, maintain aseptic technique while doing the procedure.
Joint Pain
Joint pain during 24 hours post-injection is an adverse effect occurring in up to 10% of cases, particularly with glucocorticoid injections. It may result from a local tissue injury caused by the needle alone but is usually due to an irritation reaction to the crystalline glucocorticoid or hyaluronate. The joint may be painful, perhaps even feel warm, for about 24 hours, but these symptoms ease spontaneously. The symptoms can be alleviated by analgesics or cold treatment.
Hemarthrosis
Intra-articular hemorrhage is a very rare complication of a joint injection. Antithrombotic treatment or anticoagulant medication is not a contraindication for intra-articular injection as the risk is very small, about 0–2%, even in patients using these medicines. In patients on anticoagulants, however, the smallest possible needle is recommended for joint injection.
Local Skin Atrophy or Hypopigmentation
Local skin atrophy occurs in about 1% of the patients after intra-articular injection of glucocorticoids. Typically, atrophy at the injection area develops at 1–4 months post-injection. In addition to atrophy, there may be hypopigmentation around the injection area. Atrophy and hypopigmentation are caused by subcutaneous glucocorticoid accumulation, potentially due to extracapsular injection or extracapsular seepage of the glucocorticoid via the puncture canal.
Tendon Tear
Tendon tears during intra-articular injections are very rare and are often due to unintentional injection of glucocorticoid into the adjacent tendon rather than the joint itself. To avoid tendon injuries, glucocorticoids should always be injected against low resistance.
Pericapsular Calcium Deposit
Pericapsular calcification, or calcium deposits around the joint capsule of the target joint, is very common, occurring after intra-articular injections in up to 10% of cases. Pericapsular calcium deposits are usually asymptomatic and harmless. In most cases, calcium is spontaneously absorbed from the synovial capsule but in some patients X-ray images may show even permanent calcifications, particularly in small joints such as the PIP and the DIP joints of the fingers.
Compromise of Diabetes Management
Following intra-articular injections, some of the glucocorticoid dose will be absorbed into the systemic bloodstream and in diabetic patients, for example, blood sugar level might be elevated for a few days post-injection. The risk is highest for short-acting agents or when multiple injections are given together. Patients with diabetes should be advised to step up their blood sugar monitoring post-injection, and if necessary to adjust their diabetes medication doses temporarily.
Aftercare
General Guidelines
Cover the injection site with an adhesive bandage and keep it dry and clean for 24 hours to minimize the risk of infection.
For a better therapeutic effect, avoid stress of the injected joint for 24–48 hours and avoid heavy strain for one week.
Glucocorticoids are absorbed more into the bloodstream, particularly from large weight-bearing joints, if the joint is stressed.
FAQ
What needle can be used for subtalar and talocrural joint access?
For both subtalar and talocrural joint access, a blue needle with length 30 mm/1 ¼" and size 23G can be used.
Where is the subtalar joint injection entry site?
The entry site is slightly distal and anterior to the lateral malleolus at a palpable depression.
Where is the talocrural joint injection entry site?
The entry place is at the site of palpable depression medial to the tibialis anterior and extensor hallucis longus tendons.
What should be done if the cause of joint effusion is not known?
If the cause of joint effusion is not known, take a sample if possible for cell count, crystal analysis, and bacterial culture.
What aftercare is recommended after ankle joint injection?
Cover the injection site with an adhesive bandage and keep it dry and clean for 24 hours. Avoid stress of the injected joint for 24–48 hours and avoid heavy strain for one week.
To access the full video and additional content on this subject, log in or subscribe