How to perform an ankle spanning external fixation
Source
Surgeon:
Lasse Rämö (orthopedic surgeon)
To access the full video and additional content on this subject, log in or subscribe
Summary
Focus: Temporary fixation of an unstable ankle fracture or high energy distal tibial fracture until soft tissue status allows internal fixation.
Key elements: Tibial, calcaneal, and first metatarsal pin placement; fracture reduction; frame construction; and protection of pin sites.
Indications and Clinical Context
Step-by-Step Technique
Patient Positioning, Preparation and Anesthesia
The patient is positioned supine on the operating table.
Both general anesthesia and spinal anesthesia can be used. If chosen, spinal anesthesia should be used carefully so as not to mask a compartment syndrome.
The lower limb is sterilely prepped and draped, leaving a window from the knee to the toes.
Insertion of Tibial Pins
Palpate the anteromedial surface of the tibia.
Be sure to consider the future definitive osteosynthesis operation and plan the pin placement proximal enough so that the future internal fixation hardware will not involve the pin area.
Make a small stab incision in the skin and bluntly prepare a route to the bone surface.
Place the drill guide through the route you just prepared and hold it securely against the anteromedial tibial bone. Aim in an anteromedial direction toward the posterolateral edge of the tibia.
Drill a hole in the anterior cortex through the drill guide. If you have self-drilling pins, maintain the position of the drill guide and remove the drill and inner sleeve. In the absence of self-drilling pins, drill a hole in the contralateral cortex as well before removing the drill and inner sleeve.
Advance the half pin all the way to the far cortex by hand or carefully by a power tool. It may be difficult to appreciate the pin advancing through the far cortex, so use fluoroscopy while you are advancing.
For placement of the second tibial pin, use the parallel drill guide with two soft tissue protectors. One of the soft tissue protectors will be slid over the half pin that you just placed, and the other will mark the site of the second pin. This is necessary so that the second half pin will be placed at an appropriate distance and parallel with the first one. This ensures that the pin clamp will place appropriately between the two pins.
Confirm that the pins are through the contralateral cortex using fluoroscopy. Bicortical fixation is a prerequisite for secure anchoring of the pins.
Connect the pins with a pin clamp.
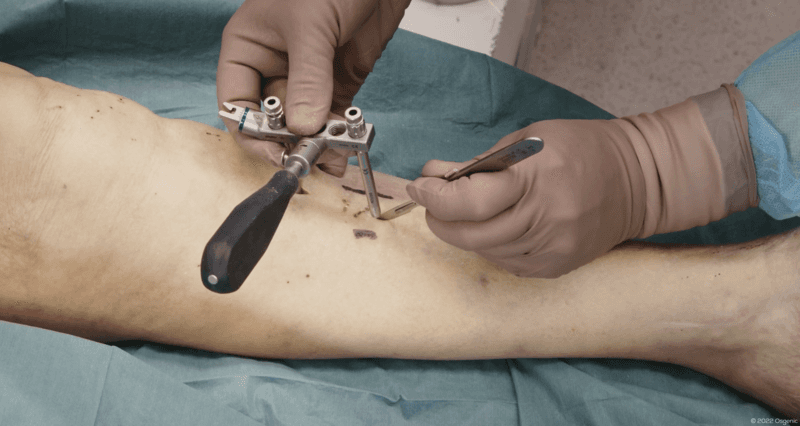
Log in or subscribe to access full content and see all the images.
Insertion of the Calcaneal and the Metatarsal Pins
Palpate the calcaneal bone from the medial side. You can also draw the landmarks and use fluoroscopy in determining the correct pin site.
Make a small stab incision in the skin and bluntly prepare a route to the bone surface.
Place the drill guide through the route you just prepared and hold it securely against the calcaneal bone.
Given the softer nature of the calcaneus, you do not need to drill the cortices. Advance the pin through the near and then the far cortex either via power or via hand. If you are using a centrally threaded pin that goes through the calcaneal bone, bring the pin through the skin on the lateral side so that the central threads of the pin remain within the calcaneal bone.
Confirm with fluoroscopy the position of the pin in the calcaneal bone.
Palpate the first metatarsal bone. You can mark the location of the TMT I joint with a needle. Confirm that you are in the correct location using fluoroscopy.
Make a small incision at the medial side of the first metatarsal and bluntly prepare a route to the bone surface.
Given the subcutaneous nature of the proximal aspect of the first metatarsal and the softness of this bone, you do not need to use a drill sleeve or a drill. Place a smaller half pin in the first metatarsal, advancing the pin through the near and then the far cortex either via power or via hand.
Check the position by fluoroscopy.

Log in or subscribe to access full content and see all the images.
Fracture Reduction and Frame Construction
Use posts in the pin clamp on the tibia and pin-to-rod connectors on the calcaneus and first metatarsal pins. Place the long rods between the pins as planned. Do not tighten the rods fully at this stage.
Reduce the fracture.
Tighten the rod-to-rod connectors.
Check the fracture position by fluoroscopy.
Readjust the position if necessary to make sure that the length, alignment and rotation of the ankle/fracture are acceptable.
Protect the pin sites with wound dressings. This can include a xeroform on the pin site followed by a halfway-cut gauze with a Kerlix dressing wrapped around the pins to keep the dressing in place.
To access the full video and additional content on this subject, log in or subscribe
Piftalls and Complications
Pitfalls
Incorrect Pin Position
If a pin is placed too close to the bone margin and not centrally in the bone, there is a risk of pin failure and/or stress riser formation resulting in an iatrogenic fracture.
If the pin does not fully penetrate the far cortex, it may loosen.
If the tibial pins are placed too close to the tibial fracture line, the fixation plate to be placed later will be in a contaminated area.
Technical Challenges or Lack of Understanding Biomechanics
Technical challenges can lead to an inappropriate fracture reduction, for example restoring length, alignment, and rotation. Failure to understand and respect the biomechanical principles of external fixation may lead to a frame that does not stabilize the fracture properly and/or a frame that may fail. The manual of the manufacturer of this external fixator can be found.
Careless Tissue Handling
After the skin incision, it is advisable to proceed bluntly to the bone surface. In particular, at the metatarsal medial side, in order to avoid soft tissue injury, for example to cutaneous nerve branches or superficial vascular structures.
If the pin is advanced too far past the opposite cortex, it may cause injury to soft tissue structures on the opposite side of the bone.
When drilling the calcaneal pin, make sure that the assistant’s hand is not on the far side of the calcaneus so that it is not accidentally injured during the procedure. Also make sure the toes are facing the ceiling so that the pin is not driven through the drapes.
The pin-clamp should be placed relatively close to the skin to maximize construct stability, but neither the connector nor any frame structures should be in contact with the skin because there needs to be room for additional soft tissue swelling.
Complications
Injuries to Neurovascular Structures
Structures located posteriorly to the tibia, for example posterior tibial artery, may be injured if the pin is drilled too deep or from the wrong direction. The correct direction is from anteromedial to posterolateral edge of the tibia. This way, we avoid the neurovascular structures in the deep posterior compartment. The correct depth of the pins, just through the far cortex, should be confirmed with fluoroscopy.
An incorrectly positioned calcaneal pin may cause injury to the neurovascular structures running posteriorly to the medial malleolus.
There is a risk of injury to the skin nerve running medially to the metatarsal bone if the route to the bone surface is prepared carelessly. Advancement to the bone surface should be done bluntly.
Fixation Failure
If a pin is placed too close to the bone margin and not centrally in the bone, there is an increased risk of pin failure or iatrogenic fracture.
If the pin does not penetrate through the opposite cortex properly, it may lose purchase in the bone.
If the rod clamps are not tightened properly, the fixation will be unstable, and the fracture reduction may be lost.
Infections
Pins placed too close to the fracture area may make the area prone to infection during the subsequent osteosynthesis operation, as there is a direct route from the skin to the bone surface.
Aftercare
Elevate the limb slightly using pillows. Once the soft tissue status has improved and the swelling subsided, the external fixation can be removed and internal fixation can be performed.
FAQ
Why is ankle spanning external fixation used?
It is used as temporary fixation for an unstable ankle fracture or high energy distal tibial fracture until soft tissue status allows internal fixation.
Which bones are used for pin placement?
The key anatomical structures are the tibial bone, calcaneal bone, and first metatarsal bone.
Why should tibial pin placement consider future osteosynthesis?
Tibial pins should be placed proximal enough so that future internal fixation hardware will not involve the pin area.
How should pin depth be confirmed?
The correct depth of the pins, just through the far cortex, should be confirmed with fluoroscopy.
To access the full video and additional content on this subject, log in or subscribe