How to perform a chest tube placement
Source
Surgeon:
Ville Vänni (trauma surgeon)
To access the full video and additional content on this subject, log in or subscribe
Summary
Focus: Chest tube placement for (tension) pneumothorax or hemothorax.
Key elements: Marking the 5th intercostal space at the mid-axillary line, blunt dissection into the thoracic cavity, tube insertion, fixation, X-ray confirmation, aftercare, pitfalls, and complications.
Indications and Clinical Context
General
Problem
(Tension) pneumothorax or hemothorax. Pneumothorax (right side) in the below picture.
Diagnosis
Traumatic pneumothorax, Pneumothorax traumaticus (ICD-10: S27.0)
Traumatic haemothorax, Haemothorax traumaticus (ICD-10: S27.1)
Traumatic hemopneumothorax, Haemopneumothorax traumaticus (ICD-10: S27.2)
Short Pathophysiological Description
Pneumothorax is caused by air entering between the parietal and visceral pleurae. The air can leak from a lung laceration or through an open wound (sucking chest wound). More air entering the pleural space during inspiration than air leaving during expiration leads to the formation of a life-threatening tension pneumothorax. Hemothorax is caused by bleeding into the same space. Primary causes, in traumatic situations, are lung lacerations, rib fractures, and lacerations of intercostal vessels or the internal thoracic artery.
Key Anatomical Structures
5th and 6th ribs
5th intercostal space
The neurovascular bundle
Lung
Parietal pleura
Pectoralis major muscle
Latissimus dorsi muscle
Axilla
Mamilla
Step-by-Step Technique
Step-by-Step Technique
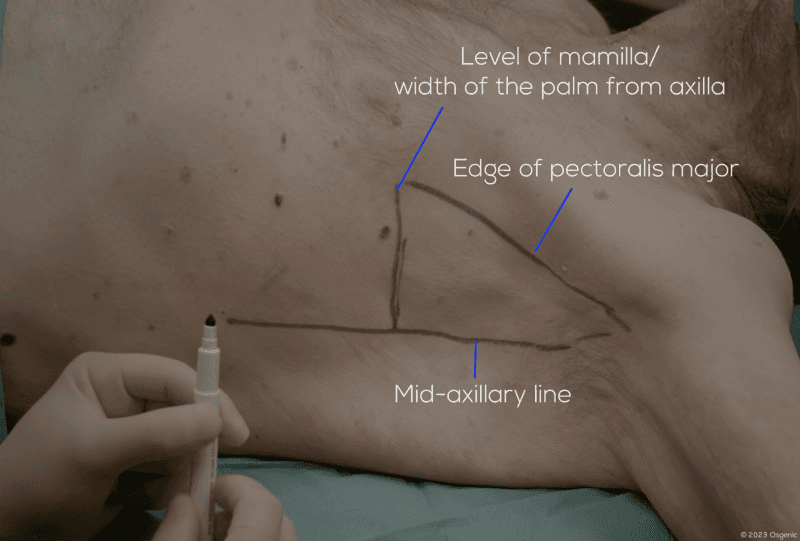
Choose and mark the incision site: abduct the ipsilateral arm by 90 degrees. Identify and mark the 5th intercostal space at the mid-axillary line and mark the place for the incision.
The site for incision is approximately at the level of mamilla, or just cranial to it for men and, correspondingly, at the level of the inframammary crease for women. It is approximately the width of the palm of a hand from the base of the axilla.Clean and drape the area.
Inject 20 ml local anesthetic, e.g. lidocaine, slowly into the skin, subcutaneous tissue, periosteum of the inferior rib and the intercostal space, all the way until the parietal pleura. Then wait 5–10 minutes for the effect of the local anesthetic. You can also apply the local anesthetic in two stages: initially into the skin and subcutis, and after making the skin incision, the intercostal muscles and the pleura.
To avoid damaging the neurovascular bundle, insert the needle perpendicular to the skin and probe the cranial ridge of the 6th rib, while simultaneously injecting anesthetic into the intercostal muscles and the pleura. Aspirate repeatedly in order to assess depth: when gas gets aspirated, the needle has pierced the pleura.
If the patient is hemodynamically compromised, proceed to tube insertion without waiting.
Systemic analgesia is also recommended. Opiates and/or non-sedative analgesics are applicable.
Skin Incision
Re-inspect and/or palpate the landmarks to reassess the correct incision location: mid-axillary line, mamilla, as well as pectoralis major and latissimus dorsi muscles.
Make a 3–6 cm skin incision, according to the mark you made, with a No. 10/11 blade. The incision should run along the cranial border of the rib, like a mini thoracotomy incision. The correct orientation is from the xiphoid process towards the axilla. The skin incision can also be made vertically towards the mid-axillary line. In depth, the incision should extend through the skin and subcutaneous tissue, until the muscle fascia.
Palpate the intercostal space with your finger to ensure correct orientation.
Log in or subscribe to access full content and see all the images.
Blunt Dissection Into the Thoracic Cavity
With a curved clamp (Roberts forceps), bluntly dissect through the muscle fibers until you reach the superior edge of the 6th rib.
Continue dissecting by spreading the fibers at the superior border of the inferior (6th) rib, until carefully puncturing through the parietal pleura.
In the case of a pneumothorax, air often flows out with a wheezing sound when the pleura is pierced, whereas blood may leak when treating a hemothorax.Open the clamp inside the pleural cavity and pull it out to widen the hole.
Insert your index finger into the pleural cavity and perform a finger sweep. This is to confirm you are entering the correct cavity and to identify possible adhesions between the lung and the thoracic wall.
Be careful of possible fractures, that may pierce the glove and/or wound your finger.You can now premeasure tube length. Avoid inserting a piece of tube longer than the distance between the skin incision and the ipsilateral clavicle, in order to avoid advancing the tube excessively. In healthy adults, the correct length is usually about 15–20 centimeters inside of the thoracic wall when the entry site is the standard 5th intercostal space.
Tube Insertion
Pinch the tip of the tube with a clamp that you can use for directing. Alternatively, you can use your index finger to guide the tube.
Direct the tube cranially and dorsally. A simple pneumothorax can be treated by anterior insertion but, for most trauma patients, the cranial and dorsal direction is recommendable, as this direction enables drainage of both air and fluid. In some cases, an additional tube directed caudally may be necessary; however, the standard direction for a trauma patient should be cranial and dorsal.
Insert the tube until all its holes are inside of the thoracic cavity. If the subcutaneous tissue layer is very thick, this needs to be taken into account when assessing tube depth.
The tube should slide effortlessly into the chest cavity. If it does not move adequately, if it does not “feel right,” it is probably incorrectly placed. In this case, pull the tube back out until the level of the parietal pleura, guide it with your finger and try again.Tube fogging with expiration confirms correct placement. In the case of a hemothorax, blood may come out, therefore, clamp the proximal end of the thoracostomy tube until connecting it to the collection/suction device.
Rotating the tube by 360 degrees reduces the possibility of tube kinking.
Secure the Tube and Verify Placement
Secure the tube to the chest wall with a size 0 to 2 suture. Both monofilament and braided sutures are applicable, as long as the thread is strong enough and allows you to make firm knots around the tube.
Apply appropriate occlusive dressing.
Inspect the tube. There is usually a small amount of fluid in it. It should be “swinging and bubbling,” i.e. indicating pressure changes and air flow in the tube along the patient's respiratory cycle. Contrarily, if the fluid stands still, it could indicate tube obstruction. Some electronic suction devices, e.g. Topaz®, indicate air leakage or obstruction. Make sure to familiarize yourself with the equipment you are using.
Connect the proximal end of the tube to an underwater drainage system (15–30 cmH2O suction).
Confirm Correct Placement on Chest X-ray
Verify the resolution of a potential hemothorax, expansion of the lung and both correct tube position and depth: no kinks and all tube holes inside the thoracic cavity.
The chest X-ray should be taken in an erect position, when possible, to better evaluate the amount of fluid/air present. If the patient's condition does not allow this, take an AP X-ray in supine position.
To access the full video and additional content on this subject, log in or subscribe
Piftalls and Complications
Pitfalls
Incorrect Entry Location of the Tube
Entering the thoracic cavity too inferiorly may lead to erroneously entering the abdominal cavity and result in iatrogenic damage to abdominal visceral organs, e.g. the liver, spleen or bowel.
In addition, the neurovascular bundle runs at the inferior surface of the rib. In order to avoid damaging it, make sure to enter following the superior margin of the (6th) rib.
Too Short Incision
The incision should be 3–6 cm long so that you can easily perform the finger sweep and help guide the tube into the pleural cavity to the right direction with your finger.
Failure to Assess the Entry Cavity With Your Finger
A generous finger sweep before inserting the tube allows assessment of the correct cavity and clearing potential adhesions between the lung and the thoracic wall. Swift entry into the chest cavity minimizes the risk of parietal pleural tenting, when the parietal pleura tears off from the thoracic wall, leading to the formation of a false extrapleural cavity. The finger sweep confirms correct entry as you can palpate the lung with the tip of your finger.
Upon entry into the pleural space, air or blood may leak from the wound. This should not keep you from swiftly carrying on with the procedure.
If the finger sweep indicates that you are in a wrong cavity or, for example, adhesions prevent adequate tube placement, it is still possible to change entry site.
Malposition of the Chest Tube
Positioning the tube into the interlobular space, or too deep caudally into the costophrenic angle, may obstruct the holes of the tube and cause tube malfunctioning.
A tube pressing the diaphragm might cause ipsilateral shoulder pain. In addition, a cranially directed tube may also cause pain, if positioned too deep, when the tip of the tube compresses the plexus nerves running at the apex of the pleural cavity.
A chest tube for trauma patients should be directed dorsally and cranially, towards the apex of the lung, in order to drain both fluids and air in a supine patient.
Use a chest X-ray to confirm the correct positioning of the tube.
Not Ensuring Chest Tube Functionality
Within the thoracic cavity, ensure that the tube does not kink, and all the holes are within the cavity. Avoid any internal tube kinks by rotating the tube 360 degrees before securing it and verify the position on the chest X-ray. The tube fogging with expiration confirms correct placement.
Careless Tissue Handling
Iatrogenic injury to the lung, mediastinal organs and tissues, the neurovascular bundle and the abdominal organs should all be avoided by careful tissue handling. When dilating the entry into the pleural space by opening a blunt instrument in the hole, never close the instrument inside of the chest cavity.
Inadequate Fixation of the Tube
If the chest tube is not properly secured, it may fall out or be inadvertently removed. Prevent the tube from slipping out by:
Securing tube fixation with skin sutures.
Verifying that your knots are tight and that the sutures hold the tube firmly. Use thick mattress sutures (size 0 to 2) in order to secure the drain and to appose the edges of the incision wound.
Making sure not to abduct the patient's arm over 90 degrees when inserting the drain; otherwise, the scapula and the subcutaneous tissue, slightly elevated due to arm abduction, could pull the drain out when the arm is re-adducted.
Considering that vast amount of subcutaneous tissue and/or elastic skin may cause the tube to withdraw from the thoracic cavity, if the tube is not placed deep enough.
Inadequate Aseptic Measures
In some circumstances, e.g. when the patient's condition is critical, there may not be time for taking adequate aseptic measures, as the procedure needs to be done immediately.
In these cases, consider prophylactic antibiotics in order to avoid infections. Prophylactic antibiotics should be routinely given also in cases of penetrating chest trauma.
Complications
Diaphragm and/or Intra-abdominal Organ Injury
It is of utmost importance to appropriately identify the intercostal level for incision. An incision made too inferiorly increases the risk of perforating the diaphragm and/or damaging intra-abdominal organs.
Damage to the Neurovascular Bundle
Careless tissue handling when advancing into the thoracic cavity can cause damage to the neurovascular bundle. Dissecting bluntly, just over the superior border of the inferior rib, and puncturing the parietal pleura cautiously, in a controlled manner, should reduce the risk of neurovascular damage.
Pectoralis Major/Latissimus Dorsi Muscle Injury
An incision made too anteriorly or posteriorly may result in the chest tube perforating the pectoralis major muscle anteriorly or latissimus dorsi muscle posteriorly, causing unnecessary bleeding. Make sure to make the incision in mid axillary line and ensure appropriate identification of intercostal level for incision to avoid this.
Breast Tissue Injury
In female patients, breast tissue may extend laterally and posteriorly towards the axilla. Try to avoid inserting the chest tube through the breast tissue by asking an assistant to retract the breast towards the contralateral side if needed.
Chest Tube Slipping Out
In addition to tube malfunctioning, the chest tube slipping out may cause subcutaneous emphysema, when air leaks from the small holes into the subcutaneous tissue. Make sure to fixate the tube properly and to verify correct positioning.
Infection
When there is not time for taking adequate aseptic measures, consider prophylactic antibiotics in order to avoid infections. Prophylactic antibiotics should be routinely given also in cases of penetrating chest trauma.
The risk of infection also increases with a prolonged recovery time. Assess the patient daily for the possibility of drain removal and promote chest physiotherapy.
Aftercare
General Guidelines
Patients with a chest tube are typically supine, in bedrest, but should be encouraged to start physiotherapy as early as possible.
Usually, the tube can be removed when the pneumothorax or hemothorax has resolved and the air or blood leakage has ended, i.e. the lung has fully expanded on X-ray and the tube no longer produces air or blood. The tube should not be removed until it produces less than 100–200 ml of serous fluid per day.
FAQ
Where is the incision site marked for chest tube placement?
The incision site is marked at the 5th intercostal space at the mid-axillary line. The site is approximately at the level of the mamilla, or just cranial to it for men, and at the level of the inframammary crease for women.
How should the tube be directed in trauma patients?
For most trauma patients, the tube should be directed cranially and dorsally, because this direction enables drainage of both air and fluid.
How is correct chest tube placement confirmed during the procedure?
Tube fogging with expiration confirms correct placement. The tube should also be inspected for “swinging and bubbling,” indicating pressure changes and air flow along the patient's respiratory cycle.
When can the chest tube usually be removed?
The tube can usually be removed when the pneumothorax or hemothorax has resolved, air or blood leakage has ended, the lung has fully expanded on X-ray, and the tube no longer produces air or blood. The tube should not be removed until it produces less than 100–200 ml of serous fluid per day.
To access the full video and additional content on this subject, log in or subscribe