How to perform a distal femoral fracture fixation with lateral locking plate
Source
Surgeon:
Lasse Rämö (orthopedic surgeon)
To access the full video and additional content on this subject, log in or subscribe
Summary
Focus: Distal femoral fracture fixation with a lateral locking plate for intra-articular and/or diaphyseal distal femur fracture.
Key elements: Reduction of the articular surface, restoration of length and alignment, lateral locking plate placement, staged screw fixation, wound closure, and early knee mobilization.
Indications and Clinical Context
General
Medical experts: Lasse Rämö (orthopedic surgeon), Jenni Liikanen (orthopedic resident)
Name of procedure: Distal femoral fracture fixation with lateral locking plate, Open Reduction and Internal Fixation (ORIF) of the distal femur using a lateral locking plate, Distal Femur ORIF, Plate Fixation of Distal Femur Fracture
Goal of Operation
To reduce and stabilize the fracture, restore the joint's anatomy, and ensure proper alignment and length of the diaphysis through lateral locking plate fixation.
Problem
Distal femoral fracture involving both the intra-articular and diaphyseal regions.
Diagnosis
Fracture of lower end of femur (ICD-10: S72.4)
Short Pathophysiological Description
Distal femoral fractures may result from a direct blow or rotational forces. In younger individuals, these injuries typically occur due to high-energy accidents, while in the elderly, they can be caused by low-energy trauma such as falling on the same level. It is recommended that in the elderly, the selected method of fixation should facilitate full weight bearing postoperatively. To achieve this, a lateral plate alone might be insufficient, and it is increasingly common to use a retrograde intramedullary nail or medial plate for additional support. Nevertheless, in this content we will only focus on the lateral locking plate for the fixation of an intra-articular and/or diaphyseal distal femur fracture.
Key Anatomical Structures
Vastus lateralis
Femur
Lateral condyle
Patella
Proximal tibia
Gerdy's tubercle
Step-by-Step Technique
Patient Positioning, Anesthesia and Preparation
The patient is positioned supine on a radiolucent operating table. It is important to ensure that the C-arm can be easily maneuvered around the table and the patient.
Slight knee flexion, about 20-30 degrees, eases reduction by lessening gastrocnemius muscle tension.
A bump under the ipsilateral buttock, inducing slight internal rotation, enhances lateral thigh and knee exposure.
The affected leg should be prepped and draped following standard sterile protocols. Depending on the fracture type, the unaffected leg can also be prepared to serve as a reference during diaphyseal fracture reduction.
Spinal or general anesthesia can be used. If the patient’s condition allows, general anesthesia is preferable as it allows for better muscle relaxation.
Landmarks and Incision Site
The incision should allow exposure of the intra-articular fracture and sufficient room for placing the lateral locking plate. The bridge plating technique used here allows for fixation while avoiding direct manipulation of the diaphyseal fracture site. As a result, the skin incision does not need to extend all the way to the diaphyseal fracture site.
The incision is planned on the lateral aspect of the distal femur, with key landmarks being the patella, distal femur, the tibiofemoral joint line, and Gerdy’s tubercle.
The incision is centered laterally over the femur. It starts from the distal side of the tibiofemoral joint line and extends proximally about 15-20 cm. This typically ensures sufficient exposure of the intra-articular fracture and room for lateral locking plate adjustment.
A too posterior incision might complicate joint surface evaluation through the lateral arthrotomy, while an overly anterior incision might limit posterior access and risk placing the plate too anteriorly.
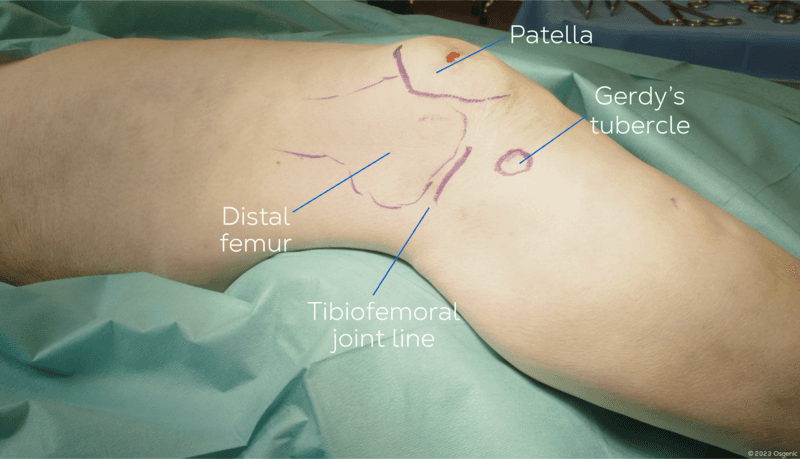
Log in or subscribe to access full content and see all the images.
Skin Incision and Advancing to the Fascia
The skin incision is made with a scalpel along the planned line. Since there are no critical neurovascular structures subcutaneously, the incision can be made sharply down to the fascia level.
As there is no tourniquet in use, meticulous hemostasis should be secured.
To enhance exposure of the fascia, the subcutaneous tissue can be mobilized. However, excessive undermining should be avoided as it might compromise wound healing.
A retractor is placed to improve visibility for the fascial incision.
Advancing Through the Fascia
The goal is to achieve sufficient fascial incision in the correct place to allow appropriate reduction and plate positioning.
For the fascial incision, Gerdy's tubercle is used as a landmark to align the incision along the center of the distal femur. For more extensive joint access, for example with a complex intra-articular fracture, the fascial incision should be positioned closer to the patella.
The incision is made with a scalpel in line with the skin incision.
Some bleeding from the circumflex vessels is typically encountered and should be coagulated.
Once the fascia is incised, the vastus lateralis muscle is identified. To enhance visibility, a retractor can be placed at the fascia level.
Exposing the Bone Surface
The aim is to expose the anterolateral side of the lateral femoral condyle and the metaphyseal area of the femur.
The distal part of the vastus lateralis muscle is detached from the underlying intermuscular septum.
Perforating vessels from the intermuscular septum should be ligated. If not ligated, these vessels may retract posteriorly, making hemostasis more challenging.Orientation towards the anterolateral surface of the lateral condyle can be ensured by palpation.
The vastus lateralis muscle is then elevated anteriorly with a curved retractor, and the bone surface is exposed.
Arthrotomy
A lateral arthrotomy is performed to explore the intra-articular space and later to confirm joint surface reduction.
An incision to the joint capsule is made lateral to the patella. If the articular surface fracture is located medially, a separate medial parapatellar incision and medial arthrotomy can be made.
Exposure to the joint can be achieved by using the retractor and extending the knee joint. This should allow for both palpation and visual inspection of the articular surface.
Reduction of the Intra-Articular Fracture
There are several options on how to reduce the condyles depending on the fracture type. Here the joystick technique is used, where the aim is to use a K-wire to manipulate the lateral condyle into the correct position to achieve anatomical reduction of the articular surface.
A K-wire is drilled into the lateral condyle but not yet crossing the vertical fracture line.
The K-wire can be used as a joystick to position the lateral condyle towards the medial condyle, while simultaneously palpating the articular surface to assess the reduction.
When the reduction is satisfactory, the K-wire can be advanced to the medial condyle, providing preliminary fixation of the fracture.
A second K-wire is then inserted slightly non-parallel to the first one to ensure the reduction.
The reduction is confirmed with fluoroscopy. There should be no gaps or notches visible on the articular surface.
When the reduction is satisfactory, the K-wires can be drilled through from the medial side to ensure they do not obstruct the site designated for the plate.
If necessary, the intra-articular fracture can be separately fixated with partially threaded cancellous bone screws, such as 6.5 mm cannulated screws. While positioning these screws, consider the plate's planned location and ensure the screws do not penetrate the articular surface.
Placing the Lateral Locking Plate
The goal is to achieve optimal biomechanical stability and alignment to the femur, while ensuring the plate is in the best position to support the fracture fragments and restore joint anatomy. The plate is positioned laterally in the middle of the femoral bone, allowing the distal screws to effectively compress the condyles together.
The plate is inserted submuscularly under the vastus lateralis from the distal direction. Gentle pressure can be applied as needed. If necessary, an instrument like a Semb rasp can be used to create space under the muscle before plate placement.
The plate is positioned on the lateral aspect of the femur, ensuring that the distal screw holes align optimally for effective fixation of the femoral condyles.
However, the plate should maintain a safe distance of 10-15 mm from the distal articular surface to avoid screw intrusion into the intercondylar area of the tibiofemoral joint.
The plate should also be positioned 5-10 mm posterior from the anterior articular surface to avoid compromising the patellofemoral joint.The plate is then fixed distally temporarily using K-wires.
Verify the plate's distal position in relation to the condyles using fluoroscopy. The K-wires used for fixating the plate should be parallel to the joint line.
Proximal Plate Positioning
The goal is to place the plate centered on the proximal femur and, after the reduction, use the same approach to fixate the plate. Here, open technique is used.
If the plate insertion guide is not available, determine the site of the correct proximal skin incision using fluoroscopy.
Make a skin incision at the planned site and advance to the fascia surface. There are no significant subcutaneous structures to avoid in this area.
Open the fascia parallel with the muscle fibers and advance bluntly through the vastus lateralis down to the plate surface.
To verify the plate’s correct location centered on the femoral diaphysis, retractors are placed anteriorly and posteriorly to the femur to expose the plate and the femur.
Reduction of the Diaphyseal Fracture
The goal is to restore the length and overall alignment of the bone, which includes sagittal (flexion/extension), coronal (varus/valgus), and rotational planes.
Traction and potential temporary fixation with clamps or wire are commonly used in the reduction process. However, in comminuted fractures, clamping is typically not feasible, and reduction is achieved using traction and fluoroscopy. A femoral distractor can also be utilized to aid in reduction. If required, reduction under visual control and palpation of the fracture gap can be performed.
Length: Shortening, due to the pull of the quadriceps and hamstring muscles, can be corrected with manual traction or a femoral distractor. Fluoroscopy, palpation, and visual confirmation can assess length restoration and ensure no fracture fragments overlap. The contralateral leg, if washed and draped, can serve as a reference; however, individual anatomical variations and potential previous trauma can cause discrepancies.
The femur's length is finalized upon insertion of the first proximal screw, following the distal screws.Sagittal (flexion/extension): The gastrocnemius muscle, attached to the distal femur, often pulls the distal fracture fragment into hyperextension. This can be reduced by initially positioning the patient's knee in slight flexion. Correct plate placement on the distal femur is key to restoring the sagittal alignment. If the distal plate is fixed in hyperextension or flexion, malalignment may occur upon fixing the proximal plate. Therefore, ensure the sagittal plane is adequately restored before final screw placement. The sagittal alignment is finalized when the second proximal screw is inserted following the distal screws. This is because the second screw acts as a second point of fixation, locking the plate and bone fragments in place, and making further adjustments to alignment more difficult without repositioning the screws and plate.
Coronal (varus/valgus): The adductors often pull the fracture into varus malalignment. When restoring the coronal plane, it is important to consider the anatomical and mechanical axis of the lower limb. One method to evaluate the mechanical axis intraoperatively is to draw a straight line from the anterior superior iliac spine (ASIS) to the center of the ankle joint, extending between the 1st and 2nd digits. This can be done using a diathermy cord. If a straight line can be drawn, the mechanical axis is likely acceptable.
Before final fixation, ensure the coronal plane is adequately restored. The frontal plane is fixed when the plate is positioned on the distal femur. If the K-wire in the middle hole of the distal plate is parallel with the femorotibial joint, the frontal alignment should be restored.Rotation: Restoration of rotation is typically achieved through traction and often external rotation of the limb. Consideration must be given to the anatomical rotation of the limb and the rotation between the proximal and distal fracture fragments. It is important to note that rotation in the pelvis, potentially due to bolsters under the affected hip, may also be present.
The mechanical axis of the lower limb can be checked to assist in restoring rotation. This involves drawing a straight line from the anterior superior iliac spine (ASIS) to the center of the ankle joint, passing between the 1st and 2nd digits. If this line is straight, the mechanical axis and rotation should be acceptable.
Fluoroscopy and, if necessary, visualization of the fracture can be used to evaluate rotation between fracture fragments. The cortical thickness of the distal fracture fragments should match the proximal ones when viewed with fluoroscopy. Any discrepancy may indicate unresolved rotational issues.
Before final fixation, ensure that rotation is adequately restored. The rotation is fixed when the first proximal screw is placed following the insertion of the distal screws.
Ensuring correct rotation in diaphyseal fractures is critical, as long bones are prone to incorrect rotation.After reduction and before final plate fixation, preliminary fixation of the plate proximally with one screw can be performed.
Confirm the plate position and appropriate reduction by fluoroscopy. Please note: When employing an anatomically designed plate using the bridge plating technique, it is often acceptable for the plate not to fit snugly on the bone in the metaphyseal area. However, if the plate appears to be a poor fit for the bone, or if the distal screws are not parallel with the femorotibial joint, it is advisable to pause and reassess your steps. If there are issues with the plate fit, it typically indicates a problem with the fracture reduction.
Proximally, in the direct lateral projection, the plate should be positioned in the center of the bone within the diaphyseal area. This positioning allows for the screws to achieve optimal stabilization through both cortices.
Distally, in a direct lateral projection with overlapping femoral condyles, the plate may seem too anterior. This is due to the anterolateral skew of the distal femur's lateral surface, causing a skewed plate projection in this view.
In a slightly oblique view, with the plate perpendicular to the C-arm rays, the edge of the lateral condyle becomes visible, confirming the plate's placement is not overly anterior, but rather posterior to the lateral condyle edge.
Plate Fixation
The primary objective is to stabilize the fracture while maintaining the reduction. This requires strategic selection and placement of screws for optimal fixation.
The fixation process is conducted in stages, alternating between distal and proximal screw placement, to enhance stability and minimize the risk of losing reduction.
Insert the first few locking screws distally. Depending on the plate's position, it might be necessary to direct some screws slightly away from the articular surface, particularly in the very distal part. The aim is to insert at least 5-6 screws distally.
Proximally, stable fixation is achieved using at least 4 bicortical locking screws. When drilling through the opposite cortex, make sure that the drill bit does not penetrate deep into the soft tissue and cause damage to the vascular structures running medially, the femoral artery and vein.
Finally, confirm the reduction, plate position, and screw lengths using fluoroscopy.
Wound Closure
The arthrotomy should be closed using a suitable material such as 2-0 Vicryl, after the joint has been carefully irrigated.
Closure of the lateral fascia with 0 or 1 Vicryl.
Close the subcutis with, for example, 2-0 Vicryl.
Close the skin with staples or sutures.
To access the full video and additional content on this subject, log in or subscribe
Piftalls and Complications
Pitfalls
Wrong Site of Incision
If the incision is too far posterior, it may complicate the evaluation of an intra-articular fracture through the lateral arthrotomy.
To avoid making the proximal incision too far posteriorly and assisting with incision length planning, use fluoroscopy to determine the correct incision site. Especially if you are not using the plate insertion guide.
Careless Tissue Handling
Be aware of the perforant blood vessels when mobilizing the vastus lateralis. Failing to ligate or coagulate these can lead to unnecessary bleeding.
The Hoffa Fracture
In a distal femoral fracture, there may also be a separate coronal fracture line where the medial or the lateral condyle, or both, are separated. These should be individually fixated using AP screws, for example. Fixation of these fractures with a locking plate is rarely successful. Therefore, before operating, carefully analyze the CT scan to avoid overlooking Hoffa’s fracture. Sagittal reformatted CT scan images are the best for spotting this type of fracture.
Complications
Infection
The severity of the injury, individual risk factors, and careless tissue handling can make the patient more susceptible to wound healing complications, potentially leading to difficult infections in some cases.
Problems in Reduction
Incomplete reduction may leave a notch or diastasis in the articular surface, predisposing the patient to post-traumatic arthritis.
Furthermore, in diaphyseal fractures, there may be residual shortening, angulation, or rotation, which could impair future functional ability and possibly necessitate reoperation. To avoid this, use fluoroscopy of the intact leg, or drape and expose both legs to facilitate perioperative evaluation of rotation, length, and angulation.
Aftercare
General Guidelines
Apply an elastic bandage around the limb. Begin mobilization of the knee joint as soon as possible. Depending on the fracture morphology and bone quality, only leg weight bearing is often allowed for the first 6 weeks, with a stepwise increase afterwards. Consider thrombosis prophylaxis.
FAQ
What is the goal of distal femoral fracture fixation with a lateral locking plate?
The goal is to reduce and stabilize the fracture, restore the joint's anatomy, and ensure proper alignment and length of the diaphysis through lateral locking plate fixation.
How is the patient positioned for distal femoral fracture fixation with a lateral locking plate?
The patient is positioned supine on a radiolucent operating table, with slight knee flexion of about 20-30 degrees. A bump under the ipsilateral buttock induces slight internal rotation and enhances lateral thigh and knee exposure.
Why is the unaffected leg sometimes prepared?
Depending on the fracture type, the unaffected leg can be prepared to serve as a reference during diaphyseal fracture reduction.
What landmarks are used when planning the incision?
The incision is planned on the lateral aspect of the distal femur. Key landmarks include the patella, distal femur, tibiofemoral joint line, and Gerdy’s tubercle.
How is the intra-articular fracture reduction confirmed?
The reduction is confirmed with fluoroscopy. There should be no gaps or notches visible on the articular surface.
What screw fixation is used distally and proximally?
The aim is to insert at least 5-6 screws distally. Proximally, stable fixation is achieved using at least 4 bicortical locking screws.
What aftercare is described after distal femoral fracture fixation?
An elastic bandage is applied around the limb, and knee joint mobilization is begun as soon as possible. Depending on fracture morphology and bone quality, only leg weight bearing is often allowed for the first 6 weeks, followed by a stepwise increase. Thrombosis prophylaxis should be considered.
To access the full video and additional content on this subject, log in or subscribe