How to perform a distal radius fracture fixation with volar locking plate
Source
Surgeon:
Teemu Karjalainen (hand surgeon)
To access the full video and additional content on this subject, log in or subscribe
Summary
Focus: Distal radius fracture fixation with a volar locking plate for a dislocated extra-articular fracture.
Key elements: Modified Henry’s approach, fracture reduction, volar plate placement, distal fixation, DRUJ examination, closure, aftercare, pitfalls, and complications.
Indications and Clinical Context
General
Medical experts: Teemu Karjalainen (hand surgeon), Jenni Liikanen (orthopedic resident)
Name of procedure: Distal radius fracture fixation with volar locking plate, Open Reduction and Internal Fixation (ORIF) of the distal radius using a volar plate, Distal radius ORIF, Palmar plating of the distal radius
Goal of Operation
To reduce and stabilize the fracture, restore the joint's function, and ensure proper alignment and length of the radius through volar locking plate fixation.
Problem
Dislocated extra-articular fracture of the distal radius.
Diagnosis
Fracture of lower end of radius (ICD-10: S52.5)
Short Pathophysiological Description
Distal radius fracture is often caused by a fall onto an outstretched hand.
Key Anatomical Structures
Radius
Watershed line
Styloid process
Volar lunate facet
Flexor carpi radialis (FCR)
Flexor pollicis longus (FPL)
Pronator quadratus (PQ)
Brachioradialis
1st compartment extensor tendons (APL, EPB)
Extensor pollicis longus (EPL)
Radial artery
Median nerve
Palmar cutaneous branch
Short radiolunate ligament
Radioscaphocapitate ligament
Step-by-Step Technique
Patient Positioning, Anesthesia and Preparation
The patient is supine, with the affected forearm elevated laterally on a hand table.
The C-arm should be positioned to be easily maneuvered around the forearm for intraoperative imaging.
The palm is facing upwards. The forearm should remain freely movable for the fracture reduction phase.
The affected forearm is prepped and draped, exposing the area up to the midpoint of the forearm.
A tourniquet is typically placed on the upper arm to manage bleeding and provide a clear surgical field.
The form of anesthesia commonly used is a brachial plexus block.
Landmarks and Incision Site
The placement of the skin incision is determined to provide access and sufficient room for fracture reduction and plate placement.
In practice, this is achieved by exposing the volar bone surface of the distal radius fracture site, extending from the ulnar to the radial cortex, and from the watershed line (the most volar ridge on the bone) up to the proximal attachment site of the pronator quadratus (PQ).
In the modified Henry's approach, the pathway to the distal radius surface is achieved by retracting FCR and FPL tendons ulnarly and partially detaching the PQ muscle, avoiding harm to the radial artery radially and the median nerve and its branches ulnarly.
The skin incision is placed using the FCR tendon as a landmark. The FCR can be identified by palpation as the most radial one, yet still located quite centrally, of the superficial tendons on the volar wrist area.
A straight incision line is planned just radial to the FCR tendon, starting from the distal wrist crease and extending proximally about 6-8 cm. This typically ensures sufficient exposure of the watershed line and the proximal attachment site of the PQ.
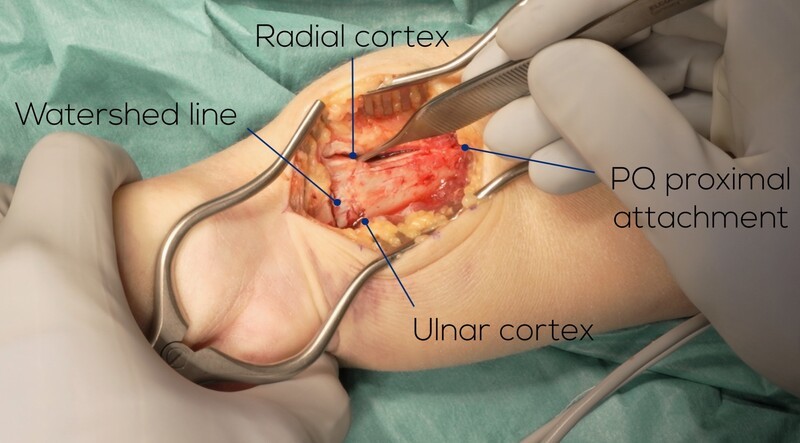
Log in or subscribe to access full content and see all the images.
Skin Incision and Exposing the FCR Tendon
The skin incision is made with a scalpel along the planned line, down to the subcutaneous fat.
Hemostasis is achieved using diathermy.
The subcutaneous tissue is incised deeper with a scalpel.
The FCR tendon can be palpated during advancement through the subcutis to confirm the direction.
A retractor is placed to provide tension and improve visibility.
The incision is made with a scalpel in line with the skin incision, radial to the FCR tendon.
The palmar cutaneous branch of the median nerve, typically located ulnar to the FCR tendon, is usually not in danger if the incision is done radial to FCR. However, its course can vary, potentially being more radial or within the FCR tendon sheath, increasing the risk of injury, especially if swelling obscures anatomy.Once the subcutaneous tissue is fully incised, the FCR tendon is identified. To enhance visibility, the retractor can be placed deeper.
The radial artery, which must be kept protected, is typically identified through its accompanying veins that are visible radially among the subcutis.
Exposing the PQ
The aim is to expose the PQ muscle for detachment by retracting FCR and FPL ulnarly.
Once the FCR is identified, it is mobilized carefully using a scalpel and then retracted ulnarly.
The FPL is then identified both visually and by palpation in the proximal part of the wound.
The FPL is mobilized and also retracted ulnarly, making a part of the PQ muscle visible. Some fibers of FPL still remain attached to the radius at this point.
Exposure to the distal end of the wound is achieved by incising the fibrous tissue using a scalpel, revealing the distal end of the PQ and the watershed line underneath.
At this distal end of the wound, small branches of the radial artery might be present, and those should be coagulated.
The transverse fibers of the FPL located proximally in the wound are divided from the radius to provide full visibility of the PQ muscle proximally.
Another retractor is placed to fully expose the PQ muscle.
Detaching the PQ
The elevation of the pronator quadratus muscle from the radius is done to expose the bone surface and the fracture site.
An L-shaped incision is positioned following the distal and radial margin of the PQ muscle. The distal (transverse) part of the incision is positioned just proximal to the watershed line.
The important volar ligaments of the wrist are attached to the radius just distal to the watershed line, and those should not be injured.The incision is made with a scalpel.
Any bleeding branches of the radial artery leading to the PQ should be coagulated.
The PQ is elevated from the bone surface with a scalpel or a rasp.
The elevation of the PQ from the bone surface might be challenging with older fractures.Once the PQ is elevated, the distal bone surface and the fracture line volarly become visible.
Exposing the Fracture Site
The aim is to expose the fracture site from the ulnar to the radial cortex, allowing accurate reduction as well as adequate room for plate/screw placement.
The PQ is retracted ulnarly, revealing the ulnar side of the fracture line. This is important as limited visibility to this area (volar lunate facet) might lead to reduction difficulties and misplacing the plate too radially.
If the volar lunate facet is not exposed and accurately reduced, the short radiolunate ligament may cause the lunate bone to follow the displaced fragment, potentially leading to an unstable radiocarpal joint and the whole carpus being misplaced.
Moreover, inadequate exposure of the fracture site ulnarly might lead to misplacing the plate too radially, causing the screws not to enter or fixate the volar lunate facet at all. This could compromise the stability of the fracture fixation.The radial fracture site and radial cortex are exposed by detaching the distal end of the brachioradialis muscle, which also eliminates its pull on the fracture fragment.
Identifying the first extensor compartment tendons while advancing radially with the scalpel allows for the safe release of the brachioradialis from the bone surface without damaging the tendons.
The superficial branch of the radial nerve also courses near the first extensor compartment tendons.The brachioradialis can be detached along the bone surface the entire length of the incision, fully revealing the radial cortex.
The fracture site is exposed from the ulnar to the radial cortex.
Reduction
The goals of fracture reduction are to restore the radius's original length, inclination and volar tilt. In this type of fracture, where no intra-articular involvement is observed, the reduction is done in three stages: first focusing on aligning the volar cortex starting from the ulnar side of the fracture, then the radial cortex, and lastly, with the plate already positioned, the correction of dorsal tilt.
Some impaction of the fracture is present ulnarly, leading to shortening of the radius.
The fracture gap is first distracted by extending it.
Using a dissector, the ulnar fragment side is levered in place so that the volar cortex ulnarly is reduced.
If the bone is osteoporotic, the cortex might be soft. In that case, a wide dissector should be used to prevent causing any additional damage when lifting the fragment in place.Perfect anatomical reduction is achieved ulnarly.
Once the volar cortex ulnarly is restored, a K-wire is used as a lever to elevate the fracture fragment radially to restore and initially fixate the radial cortex. The K-wire is inserted through the soft tissues into the fracture gap.
The K-wire is then turned and directed towards the ulnar cortex of the radius and advanced deeper to the second cortex with a drill.
It is important to use the oscillating mode when drilling to avoid injury to the superficial branch of the radial nerve located near the entry point of the K-wire.When the K-wire is positioned correctly, the outcome can be assessed by observing the reduction on the ulnar side, indicating restored radial length, and the radial side, which also appears well aligned. The fracture is now ready for initial plate placement.
Placing the Plate
The goal is to place the plate supporting the fracture, considering also the screw positioning at the distal end.
The plate should be located to minimize potential damage to surrounding tissues, such as the flexor tendons, and to avoid screw penetration into the joint.
Initially, the plate is aligned with the radius' longitudinal axis, spanning the fracture line, with the distal end just proximal to the watershed line, not distal to it, to prevent flexor tendon issues.
The plate has a tendency to tilt ulnarly, which should be avoided since it might lead to the distal screws being wrongly positioned.A K-wire is inserted to hold the initial position of the plate. The wire is drilled just past the second cortex using the oscillating mode.
The initial distal placement of the plate is also guided by aligning the radial screw hole towards the radial styloid. The aim is to direct the most radial screw in the middle of the styloid.
Another K-wire is placed proximally to hold the plate's position.
C-arm images are obtained to evaluate the plate placement.
In the AP image, the plate is seen to be aligned straight with the longitudinal axis of the radius.
In the lateral image, the plate is positioned not too distally. In this image, it is also observed that some dorsal angulation is still left, as the plate is not snug against the bone distally.When the plate's positioning seems adequate, a screw is inserted in the oval hole of the plate to keep the ulnar/radial positioning while still allowing easier adjustment in the distal/proximal direction if needed.
The hole for the screw is drilled just past the second cortex.
The depth is measured, and a cortical screw is inserted.The plate is now initially placed.
Reduction of Dorsal Angulation
The aim is to ensure the correction of the dorsal angulation at the distal end of the radius.
Before fixation, the plate should be fitting snugly against the bone surface. There should be no space for an instrument to fit between the plate and the bone.
If dorsal angulation persists, it should be corrected. This is easier with recent fractures, as older fractures may have started healing in an incorrect position.
Here, the distal K-wire is removed and the bone is pressed against the plate with the help of a bump placed underneath the hand.
As the bone is still not reduced adequately against the plate, the plate is positioned 1-2 mm proximally (the initial placement was maximally distal), achieving better contact between the bone and the plate.Once the plate is moved slightly more proximal, the bone is pressed against the plate and the reduction is assessed again with the instrument method.
Upon achieving the reduction, the distal end of the plate is initially secured with one peg inserted in the distal row of screw holes.
The result is also verified with a lateral C-arm image, where no room between the plate and the bone is present anymore.
Plate Fixation
The objective is to have the plate definitively fixated in place using pegs or screws in correct orientation and depth.
The fixation process is started ulnarly in the distal row, filling in the holes required by the fracture type and bone quality.
Locking pegs are used distally, but screws could be used as well. Both offer similar stability.This system has guide cones to help maintain the intended screw direction. Any additional aiming of the screws should not be necessary. If a screw seems to penetrate the cortex or end up inside the joint, either the plate is positioned incorrectly (too distally, tilting ulnarly) or proper reduction has not been achieved.
The depth of drilling is crucial to know. In the distal end of the plate, the screws should never penetrate the second cortex as it might lead to extensor tendon injury (irritation, rupture). The drilling is done to feel the second cortex, and then 2-3 mm is subtracted from the measurement.
As a second or third peg, to lock the potential tilting of the plate, the styloid peg in the middle of the styloid process is inserted.
Proximally stable fixation is achieved using at least 3 bicortical screws.
When all intended screws/pegs are in place, the radial K-wire can be removed and final images evaluated.
The plate is straight and the radial screw is positioned in the middle of the radial styloid.
Distal pegs do not penetrate the dorsal cortex. No screws are inside the joint but located under the articular surface. The articular surface is beneficial to examine with 20-degree tilt towards the beam to visualize the joint line. The proximal screws just penetrate the second cortex.
DRUJ Examination
The distal radioulnar joint (DRUJ) should be examined after the dislocated radius fracture has been fixated. Typically, the reduction of the fracture also leads the DRUJ to be stable. In rare cases, the DRUJ might feel unstable after reduction so that the joint feels clearly loose and lets the radius dislocate during pronation/supination movement. Only clearly unstable DRUJ should be considered for additional fixation.
The stability of the DRUJ is evaluated first in supination by holding the position of the ulna and trying to dislocate the radius dorsally. It should feel stable with an end point.
Then the movement from supination and pronation is evaluated by keeping hold of the radius and evaluating if it is unstable during the movement.
With the hand in pronation, an attempt is made to dislocate the radius volarly. Again, an end point should be present.
Closure
The PQ muscle is not reattached to the radius, as it offers no significant benefits and might also present technical challenges due to limited tissue.
However, to cover the distal part of the plate so that the flexor tendons would not be in direct contact with the plate, the PQ distal corner is turned to cover the plate.
Two stitches are secured with, for example, 2-0 Vicryl or an alternative.The tourniquet is released to check for bleeding. Final hemostasis is achieved with cautery forceps.
As retractors are removed, the plate is fully covered. The subcutaneous tissue can be closed, but here it is not closed with the aim of preventing suture fistulas.
The skin is closed with intracutaneous 4-0 absorbable monofilament sutures in this case.
To access the full video and additional content on this subject, log in or subscribe
Piftalls and Complications
Pitfalls
Wrong Site of Incision
The skin incision should be done just radial to the FCR tendon.
Making an incision too ulnarly can harm the median nerve, while an incision made too radially increases the risk of injuring the radial artery.
Careless Tissue Handling
When exposing the FCR, the median nerve and radial artery are at risk, for example, if placed under the retractor.
The palmar cutaneous branch of the median nerve typically runs ulnar to FCR, but it might have a more radial course even inside the FCR tendon sheath as an anatomical variation. When approaching and mobilizing the FCR, the palmar nerve branch should be protected if encountered.
The radiocarpal ligaments should not be injured when advancing distally and detaching the PQ distally. The watershed line is a good landmark to stay proximal to.
Inadequate Exposure of the Fracture Site
If the volar lunate facet is not exposed and accurately reduced, the short radiolunate ligament may cause the lunate bone to follow the displaced fragment, potentially leading to an unstable radiocarpal joint and the whole carpus being misplaced.
Moreover, inadequate exposure of the fracture site ulnarly might lead to misplacing the plate too radially, causing the screws not to enter or fixate the volar lunate facet at all. This could compromise the stability of the fracture fixation.
Insufficient Reduction
If the dorsal tilt, length and inclination are insufficiently reduced, it might lead to functional and mechanical problems. Functional problems in the radiocarpal joint movements and functional impairment may occur, as well as mechanical problems where the plate might end up irritating the flexor tendons.
The volar cortex is reduced from the ulnar to radial side, meaning that the length and inclination of the radius is restored.
When the bone is in contact with the anatomical plate distally, the dorsal tilt is corrected. Still, the plate should not be distal to the watershed line.
Misplaced Plate
If the plate is placed too distally, distal to the watershed line, it can cause the screws to end up in the joint, causing pain and mechanical problems. Also, the plate itself may then irritate the flexor tendons, causing them even to rupture.
When placed too proximally, the plate does not support the fracture sufficiently.
If the plate is not in the middle and in alignment with the radius, it can cause the distal screws to end up in the radiocarpal joint or penetrate the second cortex.
Too Long Screws/Pegs Distally
In the distal end of the plate, the screws should not penetrate the dorsal cortex as it might lead to extensor tendon injury (irritation, rupture). The drilling is done to feel the second cortex, and then 2-3 mm is subtracted from the measurement.
Complications
Extensor Tendon Irritation/Rupture
In the distal end of the plate, the screws should not penetrate the second cortex as it might lead to extensor tendon injury (irritation, rupture). Particularly the extensor pollicis longus (EPL) on the dorsal side is prone to irritation or rupture due to its anatomical position and tight compartment with very little room to move aside if a screw penetrates.
The drilling of the distal holes is done to feel the second cortex, and then 2-3 mm is subtracted from the measurement.
Flexor Tendon Issues
The distal end of the plate should be positioned just proximal to the watershed line, not distal to it, to prevent flexor tendon irritation.
When closing the wound, it is beneficial to cover the distal end of the plate with the PQ muscle tissue to provide some cover.
Palmar Cutaneous Branch of Median Nerve Injury
The palmar cutaneous branch of the median nerve, typically located ulnar to the FCR tendon, is usually not in danger if the incision is done radial to FCR. However, its course can vary, potentially being more radial or within the FCR tendon sheath, increasing the risk of injury, especially if swelling obscures anatomy.
Radial Artery Injury
The skin incision should be done just radial to the palpable FCR tendon, but not too radial, to avoid injuring the radial artery. The artery, or its accompanying veins, are typically identifiable when exposing and mobilizing the FCR tendon, and it should not be damaged with retractors.
Intra-Articular Screw Penetration
Screws inside the joint can cause instability, cartilage damage, and decreased range of motion. Hardware might end up in the joint due to inadequate reduction of the fracture and/or plate misplacement (too distal or tilted ulnarly). Typically, directing the screws wrong is not the root cause of this issue.
The joint area should be assessed from the lateral view with the hand tilted 20 degrees towards the beam.
Aftercare
General Guidelines
The aftercare protocols may vary between units and also depending on the fracture.
Typically, the wrist is first placed in a dorsal cast, which is then replaced with a brace that is used until 5 weeks from the procedure. Physiotherapy is started during the brace period.
FAQ
What is the goal of distal radius fracture fixation with a volar locking plate?
The goal is to reduce and stabilize the fracture, restore the joint's function, and ensure proper alignment and length of the radius through volar locking plate fixation.
Where is the skin incision planned?
A straight incision line is planned just radial to the FCR tendon, starting from the distal wrist crease and extending proximally about 6-8 cm.
Why should the volar lunate facet be exposed and accurately reduced?
If the volar lunate facet is not exposed and accurately reduced, the short radiolunate ligament may cause the lunate bone to follow the displaced fragment, potentially leading to an unstable radiocarpal joint and the whole carpus being misplaced.
Why should distal screws or pegs not penetrate the dorsal cortex?
In the distal end of the plate, screws should not penetrate the dorsal cortex because this might lead to extensor tendon injury, including irritation or rupture.
When should the DRUJ be examined?
The distal radioulnar joint should be examined after the dislocated radius fracture has been fixated. Typically, reduction of the fracture also leads the DRUJ to be stable.
To access the full video and additional content on this subject, log in or subscribe