How to perform a external fixation of the pelvis: transiliac technique
Source
To access the full video and additional content on this subject, log in or subscribe
Summary
Focus: Temporary external fixation of an unstable pelvic fracture to reduce the fracture and restore pelvic ring volume before definitive surgery.
Key elements: Supine positioning, iliac wing pin placement using ASIS and iliac crest landmarks, K-wire guidance, frame assembly, reduction assessment, wound closure, and daily wound checks.
Indications and Clinical Context
General
Medical expert: Lasse Rämö (orthopedic surgeon)
Name of Procedure: Pelvic external fixation, external fixation of pelvis, ex-fix pelvis, external pelvic fixation.
Goal of Operation
To reduce the unstable pelvic fracture and restore the pelvic ring volume by temporarily fixating it in place before definitive surgery.
Problem
Unstable pelvic ring due to traumatic injury causing instability, pain, and hemorrhage.
Diagnosis
Iliac fracture, Fractura ossis ilii (ICD10: S32.3)
Sacral fracture, Fractura sacri (ICD10: S32.1)
Pubic fracture, Fractura ossis pubis (ICD10: S32.5)
Multiple fractures of the pelvis, Fractura multae pelvis (ICD10: S32.7)
Dislocation of the sacroiliac joint, Luxatio articulationis sacro-iliacae (ICD10: S33.2)
Traumatic rupture of the pubic symphysis, Ruptura traumatica symphysis pubis (ICD10: S33.4)
Short Pathophysiological Description
Pelvic ring injury is often associated with high-energy injury and is typically accompanied by other potentially life-threatening injuries. In a polytrauma setting, the immediate goal is to stabilize the patient and manage life-threatening injuries. Due to the complexity and severity of multiple injuries, it is often not feasible to perform definitive fixation of the pelvic ring immediately. Instead, a temporary procedure like pelvic external fixation may be used.
Pelvic external fixation provides immediate stability to the pelvic ring, can help control bleeding, and can prevent further injury to surrounding structures. Later, when the patient's condition has stabilized, definitive pelvic fixation surgery may be performed, if necessary.
Key Anatomical Structures
Ilium
Iliac crest
Anterior superior iliac spine
Lateral femoral cutaneous nerve
Step-by-Step Technique
Patient Positioning, Anesthesia, and Preparation
The patient is in a supine position.
Normally, a polytraumatic patient is exposed from the jugular region to the upper thigh to enable possible simultaneous operation on the abdomen area.
The procedure can be performed without C-arm imaging, but it is recommended to use C-arm imaging to assess the fracture reduction and pin positioning.
The patient is typically under general anesthesia due to polytrauma.
Landmarks and Pin Placement Planning — Iliac Wing Fixation
The goal is to determine the optimal placement of pins in the iliac wing, ensuring reliable fixation of the fracture while avoiding damage to the surrounding structures.
The landmarks for the pin placement are the iliac crest and the anterior superior iliac spine (ASIS).
The first pin, the anterior pin, is placed 2 cm posterior to the ASIS. The second pin, the posterior pin, is placed 2 cm posterior to the first pin.
Placing the pin too near the ASIS risks iatrogenic fracture. Additionally, there is potential for damage to the lateral femoral cutaneous nerve, which usually runs medially to the iliac wing but may occasionally take a more lateral course.The skin incision is planned over the iliac crest. Either a single, longer incision of about 2 cm or two separate incisions for each pin can be made.
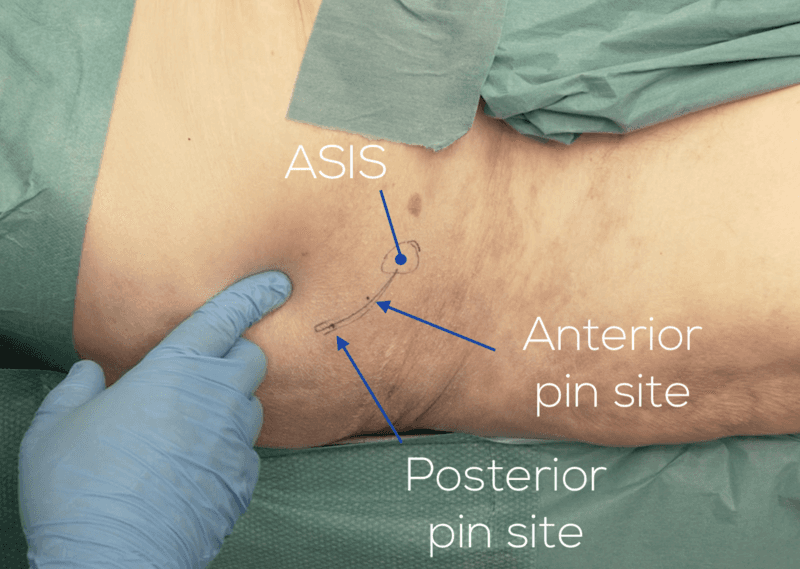
Log in or subscribe to access full content and see all the images.
Skin Incision
The skin incision should allow reliable exposure of the iliac crest for precise pin positioning to ensure stable fixation.
Incise the skin with a scalpel. There are no critical structures directly underneath the skin.
Advance through the subcutaneous tissue to the iliac crest surface. Use retractors to get better visualization. Coagulate bleeding vessels.
Palpate the iliac crest at times to maintain correct orientation. If the iliac crest can be palpated reliably through the fascia, there is no need to advance all the way to the bone surface.
K-Wire Placement
Two K-wires are placed on the inner and outer side of the iliac wing as a guide for the actual fixation pin.
Palpate the anterior superior iliac spine and move about 2 cm posteriorly along the iliac crest. This is the location of the first, anterior pin.
Manually insert a K-wire along the inner table of the iliac wing next to the location of the first pin. Palpate the iliac wing cortex with the tip of the K-wire to position it correctly along the bone surface.
Insert another K-wire along the outer table to aid in positioning the fixation pin. The trajectory of the external fixation pin should be midway between these two K-wires.
Pin Placement
The goal is to firmly place the fixation pin into the iliac wing. Two pins will be inserted on both sides of the pelvis to get stable external fixation.
Perforate the cortex of the iliac crest with a drill between the two K-wires, about 2 cm posterior to the ASIS.
Drill or manually insert the first fixation pin using the K-wires as guides, taking care not to perforate the medial or lateral cortex of the iliac wing, as this would reduce stability.
Manually tighten the pin to ensure that the pin is positioned firmly. Adjust the pin, if necessary.
Take out the K-wires and place the second, posterior pin approximately 2 cm posteriorly from the first pin. Again, place K-wires along the inner and outer tables of the iliac wing to guide the pin securely into the iliac wing.
Repeat the procedure on the contralateral side.
Frame Assembly
The goal is to assemble the frame so it can be used to fixate the reduction in place.
Build the frame using rods and connectors. There are multiple ways to build the frame but, in all cases, it should allow proper operating room for the abdomen area. Avoid tightening the clamps excessively to allow the rods to move during reduction.
The closer the frame is to the bone, the more stable the fixator becomes. However, if too close to the skin, it may lead to soft tissue complications and challenges in wound care. Ideally, a balance is required to facilitate wound care without undermining fixation stability.
Reduction and Final Tightening
The goal is to reduce the fracture and fixate it in place to restore the pelvic ring volume.
Reduce the fracture. In an open book type injury, use manual compression to the sides or the pins as leverage to reduce the fracture.
Vertical dislocation can be reduced by axial pull of the leg on the affected side.When you are satisfied with the reduction, perform a preliminary tightening of the screws by hand.
If a C-arm is available, use it to assess the reduction.
The reduction is assessed from three aspects: AP view, pelvic inlet projection, where the C-arm is tilted towards the patient’s head, and pelvic outlet projection, where the C-arm is tilted towards the patient’s feet. Each angle is used to examine that the shape and volume of the pelvic ring is restored and that the pelvic wings are level.After you have confirmed the reduction, do a final tightening of the screws manually with a T-handle.
You can gently “wiggle” the external fixation to make sure the frame is stable.
Wound Closure
Assess the tension on the skin around the pin sites. If necessary, enlarge the skin incisions to prevent pressure wounds around the pins.
Close the skin between the pins using single sutures.
If there is minimal tension around the pins after closure, use wound dressing to protect the skin from pressure wounds.
To access the full video and additional content on this subject, log in or subscribe
Piftalls and Complications
Pitfalls
Incorrect Pin Placement
When using iliac wing fixation, placing the first pin too anteriorly can cause iatrogenic fracture of the ASIS. Additionally, there is a greater risk of damaging the lateral femoral cutaneous nerve, which can cross the anterior superior iliac spine. Make sure to place the anterior pin about 2 cm from the ASIS to avoid these pitfalls.
Perforating the medial or lateral cortex of the iliac wing during pin placement can cause instability of the pin. Use K-wires on the inner and outer table of the iliac wing as guides to correctly place the fixation pins without perforating the cortex. Also, remember to test the stability of the inserted pin to ensure stable fixation.
Complications
Postoperative Bleeding
Inadequate reduction of the pelvic ring can cause excessive bleeding as the pelvic volume has not been satisfactorily decreased. Make sure to assess the reduction with C-arm imaging using AP view, pelvic inlet projection, and pelvic outlet projection.
Instable Fixation
Pin misplacement can cause instability of the frame, which might lead to re-bleeding, for instance when the patient is turned in the intensive care unit. Make sure to place the pins into the iliac wing without perforating the lateral or medial cortex and to confirm firm attachment of the pins by hand.
Pressure Wound
If the skin is under tension around the pins, it can lead to pressure wounds. Make sure to enlarge the skin incision, if necessary, to prevent pressure wounds around the pins.
Aftercare
General Guidelines
The patient may experience postoperative swelling in the pelvic region and around the pin sites, so the wound should be checked daily to prevent pressure wounds.
Pelvic external fixation is generally a temporary fixation method, and it should be removed at the time of definitive fixation of the pelvic injury.
FAQ
What is the goal of transiliac pelvic external fixation?
The goal is to reduce the unstable pelvic fracture and restore pelvic ring volume by temporarily fixating it in place before definitive surgery.
Which landmarks are used for iliac wing pin placement?
The landmarks for pin placement are the iliac crest and the anterior superior iliac spine.
Where is the anterior pin placed?
The anterior pin is placed about 2 cm posterior to the anterior superior iliac spine.
Why should the pin not be placed too close to the ASIS?
Placing the pin too near the ASIS risks iatrogenic fracture and may increase the risk of damage to the lateral femoral cutaneous nerve.
How is reduction assessed when C-arm imaging is available?
Reduction is assessed using AP view, pelvic inlet projection, and pelvic outlet projection to examine that the shape and volume of the pelvic ring is restored and that the pelvic wings are level.
What aftercare is described for this procedure?
The wound should be checked daily because the patient may experience postoperative swelling in the pelvic region and around the pin sites, which can contribute to pressure wounds.
To access the full video and additional content on this subject, log in or subscribe