How to Perform a Hip Hemiarthroplasty Posterior Approach
Source
Surgeon:
Joni Serlo (orthopedic surgeon)
To access the full video and additional content on this subject, log in or subscribe
Summary
Focus: Hip hemiarthroplasty using the posterior approach for femoral neck fracture.
Key elements: Lateral decubitus positioning, posterior exposure, femoral head extraction, femoral canal preparation, cemented stem implantation, posterior soft tissue repair, and early postoperative imaging and mobilization.
Indications and Clinical Context
General
Medical experts: Joni Serlo, orthopedic surgeon; Jenni Liikanen, orthopedic resident
Name of procedure: Hip hemiarthroplasty - posterior approach, partial hip replacement
Goal of Operation
To replace the fractured femoral neck and head with a prosthetic implant aiming to restore the stability and function of the hip joint, facilitating early mobilization.
Problem
A femoral neck fracture
Diagnosis
Femoral neck fracture (ICD-10: S72.0)
Short Pathophysiological Description
A femoral neck fracture significantly impairs mobility, which is particularly problematic for elderly patients, as prolonged immobility can lead to muscle atrophy, deep vein thrombosis, and a decline in overall health. Femoral neck fractures are associated with increased mortality. Additionally, the fracture disrupts the blood supply to the femoral head, leading to a risk of avascular necrosis, which supports the choice of arthroplasty over other treatment methods for displaced fractures.
In elderly patients or those with poor bone quality, these fractures are often due to low-energy trauma, such as a simple fall.
Hip hemiarthroplasty replaces the damaged femoral head and neck with a prosthesis, allowing for early weight-bearing, eliminating the risk of avascular necrosis, and improving functional outcomes. By facilitating early mobilization, it reduces the risk of complications associated with prolonged immobility.
Key Anatomical Structures
Greater trochanter of the femur
Lesser trochanter of the femur
Anterior superior iliac spine (ASIS)
Posterior superior iliac spine (PSIS)
Gluteus maximus, medius, and minimus
Short external rotators of the hip
Piriformis
Superior and inferior gemelli
Obturator internus
Quadratus femoris
Joint capsule
Sciatic nerve
Acetabulum
Step-by-Step Technique
Patient Positioning, Anesthesia, and Preparation
The patient is positioned in the lateral decubitus position with slight flexion on the operated hip.
The pelvis is in neutral position by 2 supports anteriorly (ASIS) and 1 support posteriorly (sacrum).
The femur should be freely movable. It should have room to achieve internal rotation and flexion that is needed particularly during the stages of posterior dislocation, neck resection, and femur broaching.
The drapes are placed high enough to enable the inspection and palpation of the bony landmarks. The lower limb is draped so that it is freely movable.
Leg length discrepancy should be checked before starting the procedure, for example by comparing the level of the patellas.
The form of anesthesia is typically spinal block or general anesthesia.

Log in or subscribe to access full content and see all the images.
Landmarks and Incision Site
To be able to dislocate the hip posteriorly, broach the femur, and implant the components via the posterior approach, a correctly placed skin incision is necessary.
The skin incision is placed by the location of the greater trochanter.
The location of the trochanter's tip, along with its anterior and posterior margins, is identified by palpation.
A slightly curving incision is positioned at the posterior third of the greater trochanter. It starts distally about 10-15 cm distal to the trochanteric tip and extends proximally about 5 cm proximal to the trochanteric tip towards the PSIS (posterior superior iliac spine).
The exact length of the incision may vary based on the subcutaneous layer thickness.A too anteriorly placed incision, in relation to the greater trochanter, might complicate accessing the joint posteriorly, while a too posterior incision might risk injury to the sciatic nerve.
Log in or subscribe to access full content and see all the images.
Skin Incision and Advancing to Fascia Lata
The skin incision is made with a scalpel perpendicular to the skin along the planned line to the subcutaneous fat level.
Hemostasis is secured with diathermy.
Subcutaneous tissue is incised with a scalpel or diathermy, and retractors are placed to improve visibility if needed.
Direction is maintained towards the posterior greater trochanter, which can be verified through palpation. A greater amount of subcutaneous tissue can easily cause drifting too posterior.
For easier fascia closure, subcutaneous tissue can be slightly mobilized from the incision site, both anteriorly and posteriorly. However, excessive undermining, which could compromise wound healing, should be avoided.
Opening the Fascia and Placing the Charnley Retractor
The goal is to open the fascia and gluteus maximus layer sufficiently and place the Charnley retractor safely without damaging the sciatic nerve.
The fascia incision is made with a scalpel in line with the skin incision.
Once the fascia is incised, the gluteus maximus fibers are identified.
The gluteus maximus is split bluntly in line with its fibers.
It is important to dissect along the direction of the gluteus maximus fibers, and not to follow the tensor fascia lata muscle fibers that are oriented more cranially.The bursal tissue under the muscle is incised sharply along with possible bursal adhesions.
Before placing the Charnley retractor, it is important to locate the sciatic nerve. It is identified by palpation and/or visually posterior to the short external rotators.
A Charnley retractor is placed at the level of the trochanteric tip to enhance visibility to the short external rotators.
The retractor should grasp the fascia and muscle layer only, not to injure the sciatic nerve.Possible remaining bursal adhesions are incised. All layers should be opened from the full length of the incision, allowing exposure to the short external rotators.
The sciatic nerve is verified to course freely.
Detaching the Short External Rotators and Opening the Joint Capsule
The goal is to detach the short external rotators from the trochanter and make a sufficiently large joint capsulotomy to be able to dislocate the femoral head.
Exposure to the short external rotators and posterior capsule area is enhanced by internal rotation of the hip and placing the foot on a Mayo stand.
The piriformis tendon and short external rotators, including superior and inferior gemelli, obturator internus, and quadratus femoris, are identified. They usually reside underneath some fat that can be swiped away. The tendinous proportion may vary as well as the extent of fatty atrophy.
The posterior border of the gluteus medius muscle is identified and retracted anteriorly with a Hohmann retractor, which exposes the piriformis tendon more clearly.
For later identification and reattachment, tagging sutures can be placed on the piriformis tendon and other short external rotators before or after detaching them.The short external rotators are detached from the trochanter. The incision is done from the level of the piriformis to the lesser trochanter.
The incision is done with a scalpel or electrocautery as close to the greater trochanter surface as possible. The joint capsule beneath the rotator muscles can be incised simultaneously, or using a separate incision.
Detaching the rotators too far from the bone surface might lead to difficulties in reattaching them during the closure step.The superior part of the capsule is incised in the posterosuperior direction towards the acetabular rim. The gluteus minimus underneath the gluteus medius should not be damaged when incising the superior capsule.
Once the capsule is incised, the femoral neck will be visualized.
The capsulotomy is sufficient to allow for the dislocation of the femoral head when distally the lesser trochanter is exposed and proximally until the bony acetabular rim is reached.
The labrum surrounding the acetabular rim should be left intact.
Dislocating and Extracting the Femoral Head
The aim is to extract the femoral head out of the acetabulum and dislocate the femur to achieve exposure for the femoral neck resection.
In fracture cases, the femoral head might not be easily reached. If it is even partly visible, it is possible to use reduction clamps or a corkscrew for secure grip for extraction.
By internally rotating the limb and simultaneously lifting with the corkscrew, the hip can be dislocated with the head.
If the extraction is difficult, the head may be attached to the ligamentum teres or capsule, which should be detached.
The diameter of the femoral head is measured. The femoral head is not perfectly spherical, so it is advisable to take measurements from a few locations and use the largest reading.
The acetabulum is assessed for any remaining fragment pieces.
Femoral Neck Resection
The aim is to remove the remaining femoral neck at the predetermined level and at the correct direction to seat the implant.
The position of the limb is checked: the heel should be directed upwards towards the ceiling. This gives good access to the dislocated neck and stabilizes the limb.
A Hohmann retractor is placed under the femoral neck to protect the soft tissues.
The correct level of the resection is determined from the preoperative plan. The reference point is typically the lesser trochanter.
The saw angle and tilt in respect to the neck of the femur should be considered.An oscillating saw is used with a firm grip with two hands to perform the initial cut along the planned line through the medial calcar region.
The resection can be completed with an osteotome directed towards the cut. Leveraging the instrument laterally towards the greater trochanter should be avoided to prevent iatrogenic fracture of the trochanter.
The resected neck is completely detached by using rongeurs and scissors, if necessary.
Opening the Femoral Canal
The aim is to access the femoral canal, avoiding a too medial access point to prevent varus malpositioning of the stem.
The positioning of the leg is rechecked: the heel should be facing the ceiling.
When the hip is dislocated posteriorly, it may lead to loss of orientation. Correctly identifying posterior/anterior and medial/lateral cortex is important for the proper entry point and stem alignment.
Any residual soft tissue should be cleared from the piriformis fossa to ensure an unobstructed area to locate the correct starting point laterally enough.
Also, any residual femoral neck should be carefully resected, as incomplete removal of the lateral neck could lead to varus malpositioning of the femoral component.The femoral canal is opened using a box osteotome. The osteotome is set at the posterolateral corner close to the greater trochanter.
Leveraging the instrument towards the greater trochanter should be avoided to prevent causing a fracture. The tapping is done just deep enough to create a passage and not further.A canal finder is used to fully open the femoral canal in line with the shaft.
Access has been achieved and the canal is ready for broaching.
Broaching the Canal
The femoral canal is shaped to fit the implant stem securely at the preplanned depth level and in correct orientation, including valgus/varus and version. When broaching, the implant-specific manufacturer's instructions should be followed.
Broaching is started with the smallest sized broach inserted into the canal, making sure to keep the lateral orientation.
Broaching too medially will end up in too small stem size in wrong orientation, varus.In addition to the lateral starting point, the alignment of the broach, version, with the calcar should be noticed. Due to built-in anteversion of the prosthesis in this model, aligning the broach with the anatomical anteversion of the neck is aimed for.
Each broach is used only to the intended depth level and then changed to larger. The depth is evaluated by referencing to the lesser trochanter.
Caution should be exercised when removing the broach to avoid striking the greater trochanter or leveraging towards it, as this could lead to an iatrogenic fracture.The final broach size will be rotationally stable on the planned depth level. The sound of hitting the broach with a mallet will also change when it is in contact with the cortical bone.
The calcar area is reamed to achieve an even plane for the collar of the prosthesis to sit on planned height.
Trialing the Components
The goal of trialing is to ensure that the chosen prosthetic components give the optimal functional outcome for the patient before implanting the final components. During trialing, it is made sure that adequate leg length and offset are restored and that range of motion, stability, and general laxity are optimized without causing instability or impingement.
A trial neck, with length and angle (117) preoperatively planned, is inserted.
With the trial neck positioned, the center of rotation level is assessed by referencing the tip of the greater trochanter to the femoral shaft axis. This ensures it matches the planned position: higher, lower, or same level.A trial head, sized according to the measure of the resected head, is inserted.
Adapters of varying sizes can be used within the trial head to adjust the depth of the trial neck. In this system the adapter sizes are -4, 0, and +4 mm. This adjustment will ultimately influence both the leg length and offset.The hip is reduced by external rotation, extension, and slight traction. It is important to verify that no tissue is interposed between the head and the acetabulum.
The range of motion is tested: is full extension of the hip achievable?
Posterior stability is tested by flexing and internally rotating the femur and assessing the tendency of the head to dislocate posteriorly out of the acetabulum.
Anterior stability is tested similarly by extending and externally rotating the femur and assessing that the head will not dislocate anteriorly.The leg length discrepancy can be assessed by comparing the level of the patellas.
Laxity/tightness: The aim is to achieve a balance where the hip joint is neither too tight, which can restrict movement and cause discomfort, nor too loose, which can lead to instability.
The push/pull test evaluates tightness: usually several mm in flexion and none or minimal in extension.The posterior capsule and external rotators' ability to be set back to their place is evaluated.
Once satisfaction with the trial is achieved, the hip is dislocated, and the trial implants are removed.
Preparing the Canal for the Cement
The femoral canal is plugged to restrict the cement from entering unnecessarily deep. The canal is lavaged to ensure the bond between the bone and the cement.
Before proceeding with implantation, the calcar should be inspected to detect any potential fractures or fissures.
A cement restrictor plug will be inserted into the medullary canal. The correct size of the plug is found by using the measuring rods.
The correct insertion depth of the plug is found by referencing to the final implant's stem. Filling the canal excessively deep with cement might cause issues if a revision surgery is needed.
The canal is irrigated with a pulse-lavage system to remove debris and fat, enhancing cement penetration into the porous bone, which improves bonding and the stability of the prosthesis.
The canal is dried and suctioned before the cement insertion. The acetabulum is protected with gauze to prevent cement from entering it.
Inserting the Cement
The aim is to insert the cement in the right consistency, acknowledging the risks involved with cementing.
The cement is mixed, and optimal consistency for inserting is tested by the manufacturer's recommendation. Typically, the cement should not feel tacky to touch at this point.
Humidity and temperature of the room will affect the cement hardening time.The cement is inserted into the canal, filling from the bottom up, simultaneously pulling out the suction.
The cement is pressurized to improve its penetration into the spongy bone.
The anesthesia team should be notified before pressurizing due to the rare risk of BCIS (bone cement implantation syndrome), which can potentially lead to sudden changes in blood pressure or oxygen levels.After the cement is applied, the implant should be inserted, typically within 6 minutes of cement mixing, as per the manufacturer's guidelines.
Implanting the Components
The goal is to implant the prosthesis down to the collar level while maintaining the desired version and varus/valgus orientation.
The insertion should be done from the lateral corner to ensure that the prosthesis is properly aligned and securely fixed within the cemented area.
An impactor is used to push the implant fully in.
The excess cement is removed.
The implant can be secured with reduction forceps while the cement hardens, typically around 11-12 minutes post-mixing. Cement hardness can be verified by tapping excess cement on a Mayo table; a metallic sound indicates it is hard. The gauze from the acetabulum is removed.
Before inserting the final head, the neck is washed and dried, and the acetabulum is rechecked to be clear.
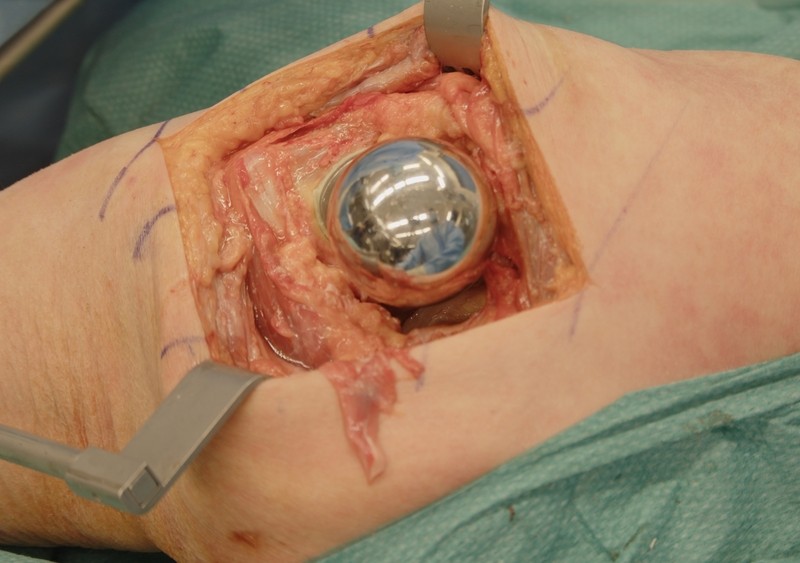
The final head is tapped in.
Ensuring no tissue interferes between the cup and the head, the hip is reduced.
Closure
The aim is to achieve a secure, watertight closure to ensure proper healing and reduce the risk of hematoma formation, infection, and dislocation. With the posterior approach, it is generally advisable to close the posterior structures carefully due to the slightly increased risk of posterior dislocation compared with other approaches.
The closure process starts with closing the capsule and the piriformis tendon close to their anatomical attachment place. To facilitate taking the deep bites, the femur can be in internal rotation.
Two suture takes, with nonabsorbable thread, are secured from the posterior capsule and one from the piriformis tendon.
Two tunnels are drilled on the greater trochanter.
The capsule sutures, along with the distal one of the piriformis sutures, are pulled through the tunnels with a suture passer. The proximal end of the piriformis suture is pulled through the soft tissue just above the tip of the trochanter.
The capsular sutures are tied with each other and the piriformis sutures with each other, resulting in neatly aligned posterior structures.
Verification of the sciatic nerve's free passage is essential. Care must be taken to ensure that the nerve is not inadvertently included in the sutures or that sutures are not positioned too close to it to cause tension.
The rest of the detached external rotators are also reattached to their anatomical locations for additional support.
The fascia and the muscular part of the gluteus maximus are closed with, for example, running sutures such as Vicryl 2. Repositioning the limb by abducting it slightly can help to approximate the tissue layers together.
The subcutaneous layer is closed with a running absorbable suture, usually in two layers if possible. Creating dead space should be avoided as it might lead to seroma or hematoma formation and potentially increase the risk of infection. The sutures in subcutis should not be too tight to prevent risk of fat necrosis.
The skin is closed with sutures or skin staples.
To access the full video and additional content on this subject, log in or subscribe
Piftalls and Complications
Pitfalls
Incorrect Site of Incision
A misplaced incision, typically too anterior, can make it difficult or even impossible to gain access to the hip joint from the posterior side. To avoid this, the greater trochanter and femoral shaft are palpated with care before making the incision. The incision should be positioned at the posterior aspect, posterior third, of the greater trochanter.
Careless Tissue Handling
Careless retractor placement can lead to damage of the sciatic nerve when placing the Charnley retractor under the fascia. Always palpate the sciatic nerve before and after the Charnley placement to prevent the sciatic nerve ending up trapped under the retractor and thus causing even permanent damage to the sciatic nerve.
Excessive force during femur broaching or stem impacting can risk femoral fractures. To avoid iatrogenic fractures to the greater trochanter, malleting away from it and avoiding unnecessary bending stress on it is advised. Both scenarios might lead to additional surgeries.
Improper Prosthesis Component Sizing
Implanting a femoral component or head of incorrect size or choosing a wrong neck angle/size can lead to a variety of complications, including instability and impingement. Preoperative templating can help ensure appropriate prosthesis sizing, but intraoperative trialing is crucial to verify a biomechanically functional outcome.
Improper Implant Component Positioning
Incomplete removal of the lateral neck of the femur can lead to varus misplacement of the femoral component. This can predispose to selecting a too small femur component, impact biomechanics, and can increase the risk of dislocation if it is combined with substantial change in length and/or offset. In addition, varus misplacement of the stem may increase the risk of periprosthetic fracture in case of falling.
To avoid varus misplacement, make sure to start laterally enough with the box osteotome and broaching.
Also be aware that incorrect internal/external rotation in the lower limb can lead to failure in determining an optimal angle of anteversion. Make sure that the assistant holds the leg in the right position.
Neglecting Cement Removal
Failure to meticulously remove excess cement after implanting can lead to complications such as prosthesis impingement. Impingement can result in restricted joint movement and increased wear of the prosthesis, potentially leading to early failure. During cementing, the acetabulum should also be protected with gauze to prevent cement from entering.
Disorientation During Surgery
Disorientation during surgery can happen, especially in obese patients. After the incision, make sure to keep going in the direction of the greater trochanter by palpating it frequently.
In addition, you should always be aware of the orientation of the limb, especially when preparing the femoral canal, to enable the right assessment of anteversion.
Complications
Sciatic Nerve Injury
The route and anatomical position of the sciatic nerve makes it prone to iatrogenic damage and is the most severe complication and a risk especially when using the posterior approach. Therefore, it must be kept in mind in many steps of the surgery. Especially erroneous placement of the Charnley retractor can lead to damage of the sciatic nerve. To avoid this, always carefully palpate the sciatic nerve before and after placing the retractor and place the retractor right beneath the fascia.
During the closure stage, it is crucial to identify and avoid the sciatic nerve, particularly when suturing the deeper layers.
Calcar Area and Greater Trochanter Fracture
When preparing the femur, the calcar area may suffer fractures. It is important to inspect the calcar area during and after broaching to notice the fracture, as it may require fixation. If a difference in resistance is felt during the stem insertion, it could potentially indicate a fracture.
Also, the greater trochanter can fracture when preparing the lateral femur. To prevent this, try to avoid unnecessary stress through bending forces on the greater trochanter. Reduction of the hip with a stem, trial or implant, too small and rotationally unstable causes stress forces to the calcar area and may also cause a fracture.
Hip Dislocation
The risk of dislocation after hip hemiarthroplasty, while rare, is still a possible mechanical complication. It is greatly influenced by patient factors, including substance or alcohol abuse, polypharmacy, chronic conditions, and stiff spine, but also surgical technique. Proper restoration of hip offset and ensuring the hip joint is neither too tight nor too loose are surgical factors related to planning and intraoperative decision making in preventing dislocation. Additionally, failure to adequately repair the posterior capsule and external rotators might lead to posterior instability and increased risk of dislocation.
Infection
Infection is a potential complication of every surgical procedure. Periprosthetic infection is a devastating complication which increases morbidity and causes a significant consumption of health care resources, requiring reoperation(s), long times of hospitalization, and long antibiotic treatments. The role of appropriate aseptic measures is emphasized. Prolonged operation time increases the risk of infection, so if for some reason the operation does not proceed well, you should not be afraid to request senior assistance early on.
Aftercare
General Guidelines
The institution's guidelines should be followed. Postoperative X-rays, pelvis AP and lateral view, are obtained as soon as possible, for verification of correct placement of the prosthesis, and to rule out any complications. Full weight bearing is usually allowed immediately.
FAQ
What is the goal of hip hemiarthroplasty using the posterior approach?
The goal is to replace the fractured femoral neck and head with a prosthetic implant to restore hip stability and function, facilitating early mobilization.
How is the patient positioned for this procedure?
The patient is positioned in the lateral decubitus position with slight flexion on the operated hip. The pelvis is kept neutral with 2 supports anteriorly at the ASIS and 1 support posteriorly at the sacrum, and the femur should remain freely movable.
Where is the skin incision placed?
The incision is positioned at the posterior third of the greater trochanter. It starts distally about 10-15 cm distal to the trochanteric tip and extends proximally about 5 cm proximal to the trochanteric tip towards the PSIS.
Why is the sciatic nerve checked during the approach and closure?
The sciatic nerve is at risk during the posterior approach. It should be identified before and after Charnley retractor placement, verified to course freely, and avoided during deeper closure suturing.
What is assessed during trialing?
Trialing assesses whether leg length and offset are adequately restored and whether range of motion, stability, and general laxity are optimized without causing instability or impingement.
What postoperative imaging is obtained?
Postoperative X-rays, including pelvis AP and lateral view, are obtained as soon as possible to verify correct prosthesis placement and rule out complications.
To access the full video and additional content on this subject, log in or subscribe