How to perform a trigger finger release
Source
Surgeon:
Matti Mustaniemi (hand surgeon)
To access the full video and additional content on this subject, log in or subscribe
Summary
Focus: Trigger finger release relieves pressure on the finger flexor tendons at the A1 pulley by splitting the pulley.
Key elements: The procedure includes patient positioning, local anesthesia, landmark identification, Bruner skin incision, tendon sheath visualization, A1 pulley splitting, verification of free tendon motion, hemostasis, wound closure, and aftercare.
Indications and Clinical Context
General
Medical expert: Matti Mustaniemi (hand surgeon)
Name of procedure: Trigger finger release
Goal of Operation
To relieve pressure on the finger flexor tendons at the A1 pulley by splitting the pulley.
Problem
Inflammation and stiffness at the A1 pulley of the finger flexor tendon sheath.
Diagnosis
Trigger finger (ICD-code: M65.3)
Short Pathophysiological Description
Loading, physical stress, trauma and/or disease may cause hypertrophy, edema and fibrosis to the flexor tendon and its surrounding soft tissues. This can restrict the normal gliding of the tendon in the tendon sheath. Symptoms begin as slight pain and may progress via a clicking sensation (or “triggering”), when moving the finger, to complete locking (inability to extend). Symptoms vary from very mild to completely impairing. The condition is most common in digits IV and III. Failure of conservative treatment indicates operative treatment.
Key Anatomical Structures
Distal palmar crease
Flexor tendons
Palmar aponeurosis
Tendon sheath and its pulleys
Intermetacarpal neurovascular bundles
Step-by-Step Technique
Patient Positioning, Anesthesia and Preparation
The patient is in supine position with the affected limb positioned laterally, hand flat (in supination) on the operation table.
Local anesthesia. Inject local anesthetic (e.g. lidocaine) slowly with a 10 ml syringe at the distal palmar crease over the A1 pulley.
A tourniquet with a pressure setting of 100 mmHg above systolic pressure can be used for hemorrhage control. Alternatively, use a local anesthetic supplemented with adrenaline.
Landmarks
Inspect and palpate the landmarks: the flexor tendon and its sheath, as well as the distal palmar crease. The A1 pulley is located at the level of MCP joint, which can be easily felt from the dorsal side of the hand. Fingers should be held extended and the hand flat on the operation table to move the neurovascular structures dorsally.
Skin Incision
Make a zig-zag (Bruner) skin incision starting above the level of the distal palmar crease, advancing to the crease and turning on it. Each leg of the incision should be about 10–15 mm in length.
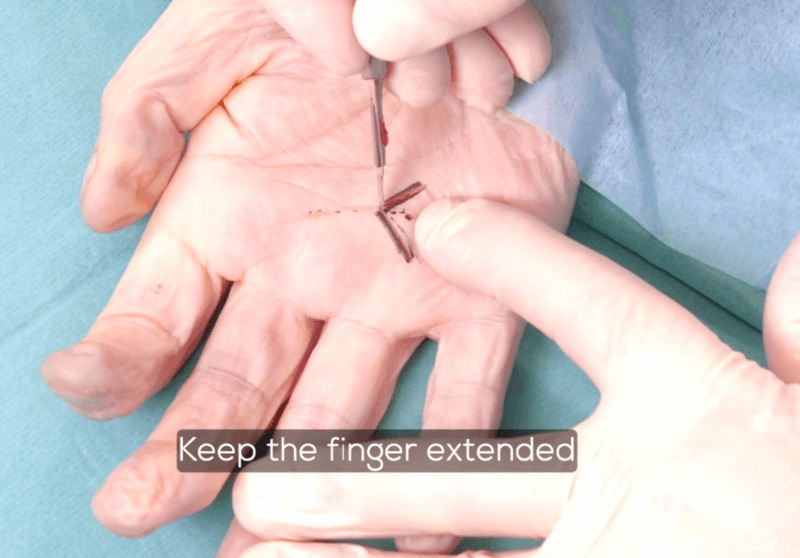
Log in or subscribe to access full content and see all the images.
Visualize the Tendon Sheath
Coagulate any bleeding vessels in and immediately below the skin (bipolar cautery forceps).
Use finger retractors to retract the skin and the subcutaneous fat radially and ulnarly.
Use tenotomy scissors to advance through the subcutaneous fat tissue. Using the retractors, advance until you reach the tendon sheath while holding the fat aside, in order to maintain good visibility.
Visualize and Split the A1 Pulley
Use a scalpel to split the A1 pulley. Its distal and proximal edges are easily inspected once opened.
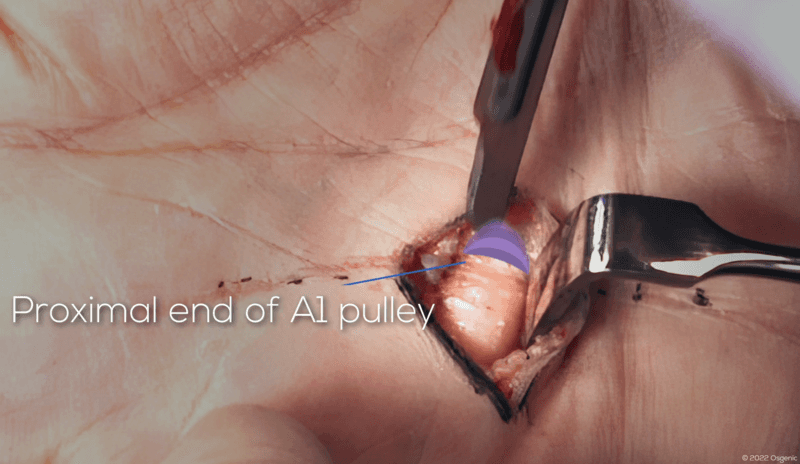
Log in or subscribe to access full content and see all the images.
Verify the Goal Has Been Accomplished and Ensure Hemostasis
Verify that no stiffness remains and the tendon is free. The patient should now be asked to flex the finger in order to make sure no triggering occurs.
Release tourniquet, if used, and coagulate any bleeding vessels (bipolar cautery forceps).
Wound Closure
The only layer that requires suturing is the skin. Use 4-0 or 5-0 interrupted monofilament sutures.
Apply a non-bulky hand surgical dressing that permits maximal postoperative hand mobility.
To access the full video and additional content on this subject, log in or subscribe
Piftalls and Complications
Pitfalls
Incorrect Site of Incision
The incision is commonly made too distally, which can lead to opening or partially damaging the wrong (A2) pulley. This can be avoided by locating the A1 pulley and marking it before performing the incision.
Crossing the crease perpendicularly could cause contracting scarring that can severely impair hand function, so the incision should zigzag, using a Bruner incision.
Improper Hand Positioning
Laying the hand flat brings the flexor tendon closer to the skin in relation to the neurovascular bundles. If the fingers are flexed during surgery, there is a higher risk of neurovascular damage. To avoid damage to the neurovascular bundle please ask your assistant to hold the finger extended during the procedure.
Careless Tissue Handling
Splitting the A1 pulley should be done with caution to prevent damage to the underlying flexor tendon.
Complications
Neurovascular Damage
Failure to hold the hand flat (fingers extended) while visualizing the tendon sheath and the A1 pulley may lead to neurovascular damage. Keeping the fingers extended moves the neurovascular bundles towards the dorsal side of the hand.
Damage to the Radial Digital Nerve of the Thumb
If operating on the thumb, be aware that the radial digital nerve of the thumb can cross the operative field and should be protected when visualized.
Tendon Laceration
Incising the pulley too deep when visualizing and splitting the A1 pulley may cause tendon laceration.
Incomplete A1 Pulley Release
Incomplete A1 pulley release is possible if the edges of the pulley are inadequately exposed.
Damaging or Releasing the A2 Pulley
Excessive incising may damage the A2 pulley, which could lead to tendon bowstringing and pain.
In some cases, the A2 pulley might be opened instead of the A1 pulley due to disorientation. This can be prevented by carefully making the skin incision according to the right landmarks.
Aftercare
General Guidelines
For most patients early postoperative mobilization and resuming daily activities are recommended. Local soreness, swelling and scarring of the area are common postoperative symptoms; however, these usually recede within the following months.
FAQ
What is the goal of trigger finger release?
The goal is to relieve pressure on the finger flexor tendons at the A1 pulley by splitting the pulley.
Where is the A1 pulley located?
The A1 pulley is located at the level of the MCP joint, which can be easily felt from the dorsal side of the hand.
Why should the fingers be held extended during the procedure?
Fingers should be held extended and the hand flat on the operation table to move the neurovascular structures dorsally.
What layer requires suturing during wound closure?
The only layer that requires suturing is the skin, using 4-0 or 5-0 interrupted monofilament sutures.
To access the full video and additional content on this subject, log in or subscribe